Flutter does not sign iOS apps itself; Xcode does. To run on a real iPhone, open ios/Runner.xcworkspace, select the Runner target, and under Signing & Capabilities leave Automatically manage signing on and pick your Team. Xcode then creates the development certificate and profile, and flutter run installs the app.
For TestFlight, flutter build ipa builds an archive and exports an .ipa signed for App Store Connect with an Apple Distribution certificate. You upload that file with Apple's Transporter app, the altool command or Xcode's Organizer, and it appears in TestFlight once Apple has processed it.
This guide follows that path in order, with the plain explanation first, then the settings, the commands, and the errors people hit along the way.
Where signing fits in a Flutter app
Every app on an iPhone must carry a signature that traces back to Apple, plus a provisioning profile that says where it may run. A Flutter project's ios folder is an ordinary Xcode project, with the app as the Runner target, so it gets signed exactly like a native Swift app. The signing settings live in ios/Runner.xcodeproj, not in pubspec.yaml.
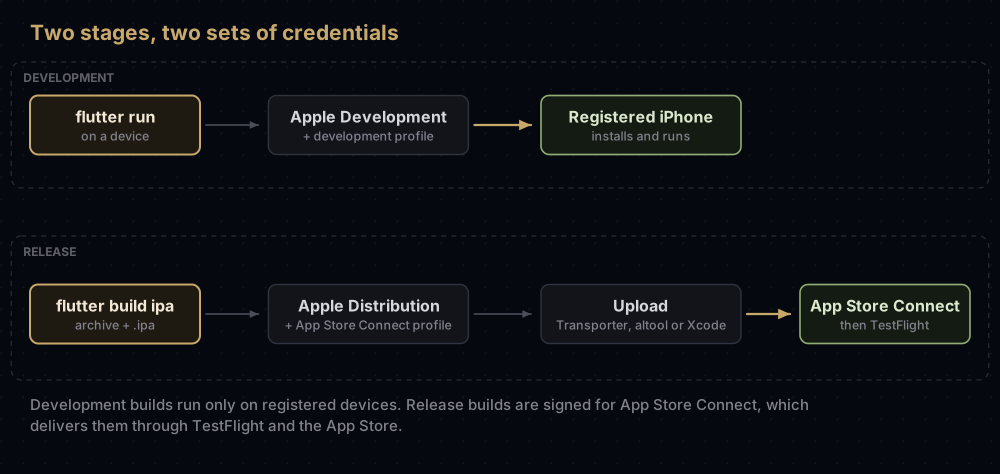
There are two stages, with different credentials:
- Development: an Apple Development certificate and a development profile that lists your registered test devices. This is what
flutter runuses on a phone. - Release: an Apple Distribution certificate and an App Store Connect profile. This is what
flutter build ipauses by default, for TestFlight and the App Store.
If the difference between the two certificates is new to you, Apple Development vs Apple Distribution explains it, and provisioning profiles explained covers the profile.
What you need
| Item | Why | Notes |
|---|---|---|
| A Mac with Xcode | Only Xcode can sign and build iOS apps | Flutter's setup guide also runs xcodebuild -runFirstLaunch and asks you to accept the Xcode licence |
| An Apple Account signed in to Xcode | Xcode uses it to create certificates and profiles | Add it with Add Account… in the Team menu if it is missing |
| Apple Developer Program membership | Needed for TestFlight, the App Store, and anything in Certificates, Identifiers & Profiles | A free account can run apps on your own device, with limits (below) |
| An iPhone or iPad | For device testing | Developer Mode must be on |
| CocoaPods | Plugins with native iOS code may need it | Flutter's setup guide asks for the latest version |
Flutter currently supports iOS 13 and later, which is the default deployment target in a new project.
Step 1: the first run on a real device
Prepare the phone
- Connect it to the Mac with a cable. When the phone asks Trust this computer?, tap Trust.
- Turn on Developer Mode: Settings → Privacy & Security → Developer Mode, switch it on, restart, then tap Turn On when asked. If the option is missing, Flutter's guide says to connect the phone with its passcode entered, trust the computer, and open Xcode or run
flutter runonce so the option appears.
Set the team in Xcode
open ios/Runner.xcworkspaceOpen the .xcworkspace, not the .xcodeproj. Then:
- Select Runner in the project navigator, then the Runner target.
- On the General tab, check the Bundle Identifier. Replace the template's
com.exampleprefix with your own reverse domain; it has to be an identifier your team can register with Apple. - On Signing & Capabilities, keep Automatically manage signing ticked and choose your Team. If no team is listed, choose Add Account… from the same menu.
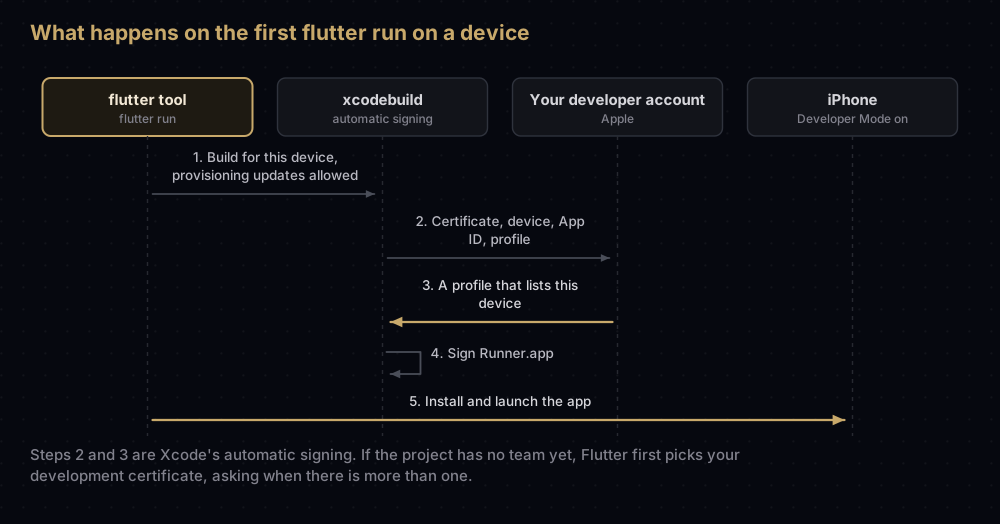
With automatic signing, Xcode does the portal work for you: it creates a development certificate if the Mac has none, registers the connected device, registers the App ID, and downloads a matching profile.
Recent Flutter versions may already have filled in the team: when flutter create runs on a Mac with a development certificate, it looks up that certificate's team (asking you to pick if there are several) and writes it into the new project.
Run it
flutter runWhen the project already has a team, Flutter prints a line such as "Automatically signing iOS for device deployment using specified development team in Xcode project", followed by the Team ID. When it has none, Flutter looks at the development certificates in your keychain. With one, it uses it; with several, it lists them, says "your choice will be saved", and asks you to pick. To forget that choice:
flutter config --clear-ios-signing-settingsFlutter also passes -allowProvisioningUpdates and -allowProvisioningDeviceRegistration to xcodebuild, which is what lets Xcode create profiles and register the device during a command-line build.
If the phone will not open the app the first time, Flutter's setup guide has you trust your developer certificate on the phone: open the VPN & Device Management screen in Settings, find your certificate under Developer App, and tap Trust. (Older messages from the Flutter tool call the screen Device Management.)
With a free Apple Account
A personal team without the paid program can still run apps from Xcode, with Apple's limits: up to 3 devices, up to 3 apps per device, up to 10 App IDs, and profiles that expire 7 days after they are issued, after which the app stops opening until you rebuild and reinstall. There is no TestFlight, no App Store Connect and no access to Certificates, Identifiers & Profiles.
When signing fails on flutter run
The Flutter tool prints boxed messages for the common cases. What they mean:
| Message starts with | Cause | Fix |
|---|---|---|
| "No valid code signing certificates were found" | The Mac has no development certificate with its private key | Sign in to Xcode, select a team on the Runner target and let Xcode create one. If the certificate was made on another Mac, see missing private key in Xcode |
| "No Provisioning Profile was found for your project's Bundle Identifier or your device" | No profile covers this bundle ID and device, or a copy of the app on the phone was signed with a different certificate | Select the team, use a unique bundle ID, register the device, let Xcode create the profile. If an older copy signed with a different certificate is on the phone, remove it |
| "Building a deployable iOS app requires a selected Development Team with a Provisioning Profile" | The Runner target has no team | Choose the team under Signing & Capabilities |
| "Saved signing certificate ... is not a valid development certificate" | The certificate Flutter remembered is gone or expired | flutter config --clear-ios-signing-settings |
| Xcode: the provisioning profile "doesn't include" an entitlement | A capability, such as Push Notifications, was added after the profile was made | Let automatic signing refresh it, or regenerate the profile; see iOS entitlements explained |
| Keychain shows the certificate as "not trusted" | The Apple intermediate certificate is missing | See the WWDR intermediate fix |
The three boxed messages also suggest running on the iOS Simulator, which needs no code signing.
Extensions need signing too
Widgets, notification service extensions and share extensions are separate targets with their own bundle IDs, starting with the app's (for example com.example.app.widget). Each one needs:
- the same Team selected on its own Signing & Capabilities tab
- its own App ID and profile (automatic signing makes them)
- the same capabilities as the data it touches: sharing data with the Runner app needs the App Groups capability on both targets, as App Groups on iOS explains
Every embedded target is signed along with the app, so check each one, not just Runner.
Step 2: prepare App Store Connect
Before the first upload, Flutter's release guide has you:
- Register an explicit App ID for the bundle ID in Certificates, Identifiers & Profiles, with the capabilities the app uses.
- In App Store Connect, open Apps, click the add button, choose New App, tick iOS, and fill in the details, selecting that bundle ID.
The bundle ID is locked once the first build is uploaded, so settle it now. Bundle ID vs App ID explains the two names, and changing a bundle ID covers what is still possible.
Then set the version. In pubspec.yaml:
version: 1.0.0+1The part before + becomes CFBundleShortVersionString (the version users see), and the part after it becomes CFBundleVersion (the build number). Each upload needs a unique build number. You can override both on the command line with --build-name and --build-number.
Step 3: build the IPA
flutter build ipaThis writes an Xcode archive to build/ios/archive/ and an App Store .ipa to build/ios/ipa/. Flutter's guide suggests adding --obfuscate --split-debug-info=<directory> if you want Dart code obfuscated.
Export methods
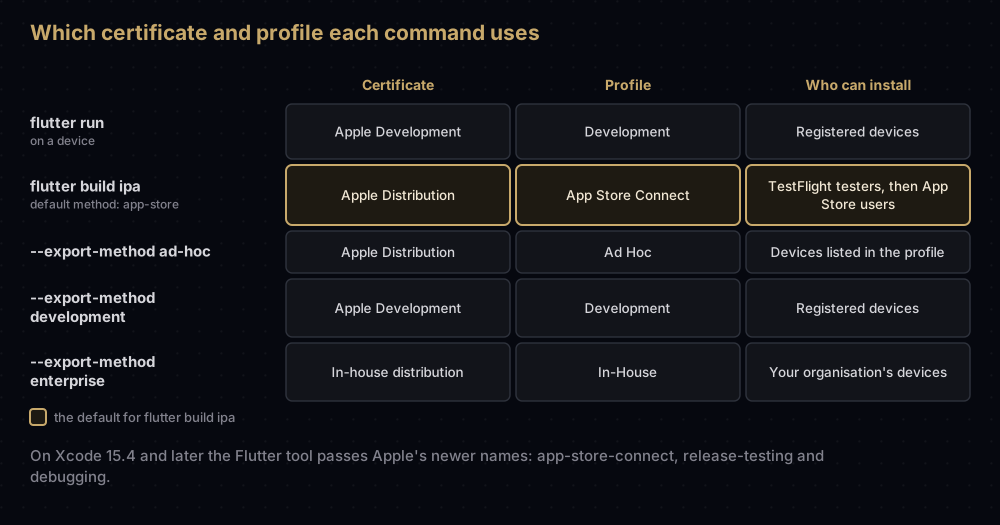
--export-method | What Flutter asks Xcode for (Xcode 15.4 and later) | Certificate and profile | Who can install |
|---|---|---|---|
app-store (default) | app-store-connect | Apple Distribution, App Store Connect profile | Testers through TestFlight, then App Store users |
ad-hoc | release-testing | Apple Distribution, Ad Hoc profile | Devices listed in the profile |
development | debugging | Apple Development, development profile | Registered devices |
enterprise | enterprise | In-house distribution, In-House profile | Your organisation (Enterprise Program only) |
Apple renamed three export methods in Xcode, and the Flutter tool translates the old names for you. The Ad Hoc route, including the device limits and a warning about the flag's help text, is covered in Ad Hoc distribution on iOS.
Manual signing with ExportOptions.plist
When you export from Xcode's Organizer, Xcode writes an ExportOptions.plist next to the .ipa. Flutter can reuse it, so you can make the same export again without opening Xcode:
flutter build ipa --export-options-plist=ios/ExportOptions.plist--export-options-plist cannot be combined with --export-method. For manual signing, for example with profiles from fastlane match, the plist names a profile for each bundle ID:
<?xml version="1.0" encoding="UTF-8"?>
<!DOCTYPE plist PUBLIC "-//Apple//DTD PLIST 1.0//EN" "http://www.apple.com/DTDs/PropertyList-1.0.dtd">
<plist version="1.0">
<dict>
    <key>method</key>
    <string>app-store-connect</string>
    <key>teamID</key>
    <string>A1B2C3D4E5</string>
    <key>signingStyle</key>
    <string>manual</string>
    <key>signingCertificate</key>
    <string>Apple Distribution</string>
    <key>provisioningProfiles</key>
    <dict>
        <key>com.example.app</key>
        <string>match AppStore com.example.app</string>
        <key>com.example.app.widget</key>
        <string>match AppStore com.example.app.widget</string>
    </dict>
</dict>
</plist>
xcodebuild -help lists every key the file accepts.
Step 4: upload to App Store Connect
Flutter's release guide gives three routes:
-
Transporter. Install Apple's Transporter app from the Mac App Store and drag in
build/ios/ipa/*.ipa. -
The command line, with an App Store Connect API key:
xcrun altool --upload-app --type ios -f build/ios/ipa/*.ipa --apiKey your_api_key --apiIssuer your_issuer_id -
Xcode. Open
build/ios/archive/Runner.xcarchive, click Validate App, fix anything it reports, then Distribute App.
A note on altool: the version in Xcode 26.6 also lists --upload-package for app uploads, spells its key options --api-key and --api-issuer, and looks for the key file, named AuthKey_ followed by the Key ID and .p8, in folders such as ~/.appstoreconnect/private_keys. Run xcrun altool --help to see what your Xcode accepts. The key itself is covered in App Store Connect API keys.
Apple's own help page adds two points. App Store Connect accepts uploads from Xcode, Swift Playground, altool, Transporter and the App Store Connect API. And Apple's table of supported versions requires iOS apps to be built with Xcode 26 or later, so check the Xcode version on your build machine.
After the upload, Apple processes the build before it appears in App Store Connect, and emails you when that is done.
Step 5: TestFlight
Once processed, the build can go to testers. In App Store Connect, open the app's TestFlight tab, create an internal group, add the build and add testers. Internal testing covers up to 100 App Store Connect users; external testing reaches up to 10,000 people but the first build is reviewed. Builds last 90 days. The full comparison with Ad Hoc is in Ad Hoc distribution on iOS.
One thing that changes between your flutter run build and the TestFlight build: TestFlight uses APNs production, while a development build uses the sandbox. If push notifications work from your machine but not from TestFlight, check which environment your server sends to; APNs explained covers the two.
Signing on a CI machine
A build server has no one to click through Xcode, so it needs the certificate, private key and profiles delivered some other way. The main options:
- fastlane match, which installs a shared, encrypted set in readonly mode. See fastlane match.
- A
.p12and profiles stored as CI secrets, imported into a temporary keychain at build time. See export a .p12 from Keychain. - Codemagic CLI tools, which Flutter's release guide walks through: an App Store Connect API key with App Manager access, a temporary keychain, fetching signing files,
xcode-project use-profiles, thenflutter build ipa --export-options-plistand a publish command.
xcodebuild itself can also authenticate with an App Store Connect key (-authenticationKeyPath, -authenticationKeyID and -authenticationKeyIssuerID, together with -allowProvisioningUpdates). flutter build ipa has no flags for those, so a job that wants that route has to call xcodebuild for that step.
Common mistakes
- Opening
Runner.xcodeprojinstead ofRunner.xcworkspace. The workspace includes the CocoaPods projects. - Keeping the template's
com.examplebundle ID. Use your own reverse domain before registering anything. - Setting the team on Runner only. Every extension target needs it too.
- Adding a capability in the portal but not in Xcode, or the reverse. The entitlements and the profile must agree.
- Reusing a build number. Each upload needs a new one; bump the number after
+inpubspec.yaml. - Mixing
--export-options-plistwith--export-method. Flutter refuses the combination. - Building on an old Xcode. App Store Connect requires iOS apps built with Xcode 26 or later.
- Testing push on TestFlight with sandbox tokens. TestFlight builds use APNs production.
- Leaving Developer Mode off. The phone will not run the development build.
Questions people ask
How do I set the development team for a Flutter iOS app?
Open ios/Runner.xcworkspace, select the Runner target, go to Signing & Capabilities, keep "Automatically manage signing" on and choose your team. Do the same for any extension targets.
Do I need a paid Apple Developer account to run Flutter on an iPhone?
No, a free Apple Account can run apps on your own device from Xcode, with limits: 3 devices, 3 apps per device, and profiles that expire after 7 days. TestFlight and the App Store need the paid program.
Where are iOS signing settings stored in a Flutter project?
In the Xcode project, ios/Runner.xcodeproj, as build settings such as DEVELOPMENT_TEAM and CODE_SIGN_STYLE. Flutter's pubspec.yaml only supplies the version and build number.
What does flutter build ipa need to succeed?
An Apple Distribution certificate with its private key (or permission for Xcode to create one), a registered App ID, and a way for Xcode to get an App Store Connect profile, which automatic signing handles. Every embedded extension needs the same.
How do I upload a Flutter .ipa to App Store Connect?
Drag it into Apple's Transporter app, upload it with xcrun altool and an App Store Connect API key, or open the archive in Xcode and use Distribute App.
How do I fix "No valid code signing certificates were found" in Flutter?
Sign in to Xcode with your Apple Account, open the Runner target, select your team, and let automatic signing create a development certificate. If the certificate exists but was made on another Mac, you also need its private key.
How do I reset the signing certificate Flutter remembers?
Run flutter config --clear-ios-signing-settings. Flutter asks again the next time it needs to choose.
Can I build a Flutter iOS app without a Mac?
Not with the tools in this guide. Signing and building need Xcode, which runs on macOS, so any CI service you use has to provide a macOS machine for this step.
Sources
- Build and release an iOS app and Set up iOS development, Flutter documentation
- Flutter tool signing code, Flutter on GitHub
- Upload builds, App Store Connect Help
- Distributing your app for beta testing and releases and Enabling Developer Mode on a device, Apple
- Choosing a membership, Apple
Keep reading
- Provisioning profiles explained: what Xcode is creating behind automatic signing.
- App Store Connect API keys: the key behind command-line uploads.
- fastlane match: one shared set of certificates for a team and CI.
- Ad Hoc distribution on iOS: test builds without TestFlight.
- Export a .p12 from Keychain: moving a certificate to another Mac or a build server.