To export a .p12 on a Mac, open Keychain Access, go to My Certificates, expand your certificate so its private key shows, select both the certificate and the key, and choose File > Export Items. Pick Personal Information Exchange (.p12), save, and set a password. On another Mac, double-click the file and type that password.
For a CI server, the same file becomes a secret: you store it as base64 text, and the build job decodes it and imports it into a temporary keychain with the security command.
The key is what matters. A certificate on its own is public and cannot sign anything, so a .p12 without the private key is useless on the other end. Below are the export itself, importing on a second Mac, and a tested setup for GitHub Actions.
What a .p12 carries
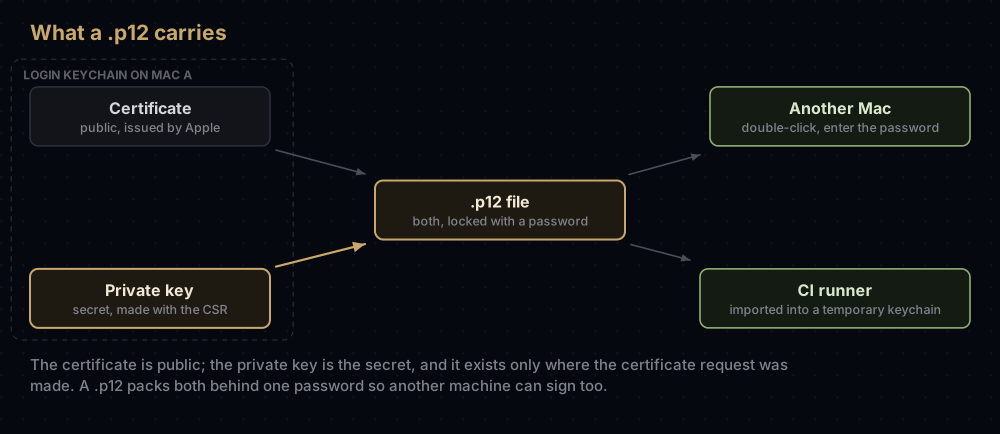
Think of a .p12 as a locked briefcase. Inside is your ID card (the certificate Apple issued) and your stamp (the private key your Mac made when you created the certificate signing request). The password is the briefcase lock.
Apple's code signing technote calls that pair a digital identity, and says Apple's tools prefer the PKCS#12 format for moving one around. Keychain Access calls the pairs My Certificates, and Xcode calls them signing certificates. They all mean the same thing: a certificate whose private key is present.
Two consequences follow:
- Anyone with the file and the password can sign as your team. Apple asks for a strong password and for sending the file and the password through different channels, for example the file by email and the password in a call.
- You can only export from a Mac that has the key. Apple never had your private key, so nothing downloaded from the portal can replace this step.
Before you export: check the key is there
In Terminal, list the signing identities on this Mac:
security find-identity -p codesigningThe command lists certificates whose private key is present, first all of them and then the valid ones only. If yours appears, for example as "Apple Distribution: Example Team (A1B2C3D4E5)", you can export it, even if it carries a warning in brackets such as an expiry. If it does not, this Mac has the certificate at most, and the key lives on whichever Mac made the request. Missing private key in Xcode covers that situation.
Export from Keychain Access, step by step
- Open Keychain Access. Search for it in Spotlight. On recent macOS it is no longer in the Utilities folder.
- Choose the login keychain and open My Certificates. This view shows certificates that have a private key.
- Find your certificate and expand it with the disclosure arrow. Apple's steps say you will see both a certificate and a private key.
- Select both. Click the certificate, then Command-click the key under it.
- Choose File > Export Items (Shift-Command-E). If the menu item is dimmed, Apple's guide says at least one selected item cannot be exported.
- Set File Format to Personal Information Exchange (.p12), choose a name and a place, and click Save.
- Enter a password when Keychain Access asks for one to protect the exported items. You will need it to import the file anywhere else.
The other formats in that menu, Certificate (.cer), Privacy Enhanced Mail (.pem) and Certificate Bundle (.p7b), are not what you want here. For moving a signing identity, .p12 is the format Apple's steps use.
Why the key has to be in the selection
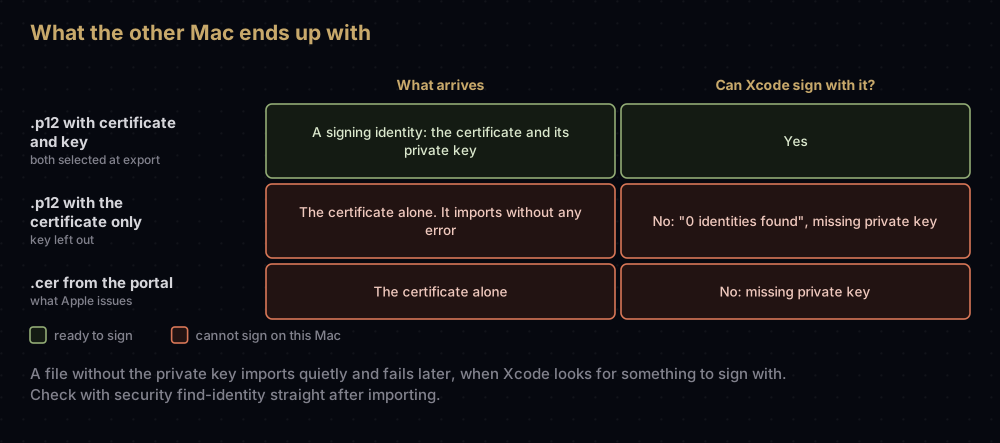
The failure is quiet, which is what makes it painful. While testing this post, a .p12 holding only the certificate imported into a keychain with no error at all, and security find-identity -p codesigning then reported "0 identities found". On a teammate's Mac that shows up later as a certificate Xcode will not sign with.
So always export from My Certificates, with the key expanded and selected. If there is no key under the certificate, there is nothing to export.
Exporting from Xcode instead
Xcode can export the same thing in fewer clicks. Choose Xcode > Settings, click Accounts, select your Apple Account and team, then Manage Certificates. Control-click the certificate, choose Export Certificate, pick a location, and enter a file name and a password. Apple's documentation says the result is a password-protected PKCS#12 file, with the password protecting the identity's private key.
The same sheet has Email Creator, which opens a message to whoever made a certificate, so you can ask them for the .p12 when your Mac lacks the key.
Exporting from Terminal
The security tool can export too, but it works on a whole keychain, not a single certificate:
security export -k ~/Library/Keychains/login.keychain-db -t identities -f pkcs12 -o identities.p12That writes every identity in the login keychain into one file, and asks for the password in a dialog (-P sets it on the command line instead, which leaves it in your shell history). If a key's access settings do not include the security tool, the export needs your permission, and without it the command stops with "User canceled the operation" (seen in testing with a key that only allowed codesign). For a single certificate, Keychain Access or Xcode is simpler.
Import on another Mac
The quickest way is to double-click the .p12 and enter its password. Apple's Xcode documentation says Keychain Access then imports the identity into your login keychain.
If you want to choose the keychain, use File > Import Items in Keychain Access (Shift-Command-I), pick the file, and choose a Destination Keychain.
Then check it arrived as an identity, not just a certificate:
security find-identity -p codesigningIf the certificate is listed under "Valid identities only", Xcode can sign with it. If it is listed only in the first part, with a reason in brackets, the key arrived but the identity is not usable yet. Two things commonly stand in the way:
- "Certificate is not trusted" in Keychain Access usually means the Mac is missing Apple's matching intermediate certificate. See Apple certificate "is not trusted".
- A provisioning profile made for a different certificate. Ad Hoc and App Store Connect profiles hold one distribution certificate each, so the profile has to contain the certificate you just imported.
Can OpenSSL read the file? A .p12 written by macOS's own tools uses older encryption. In testing on macOS 26.5, a file from security export used RC2 and Triple DES with a SHA-1 check, and OpenSSL 3 refused to read it until -legacy was added:
openssl pkcs12 -legacy -info -in identities.p12 -nokeysConverting between .p12 and PEM is covered in converting signing files.
Use it in CI with GitHub Actions
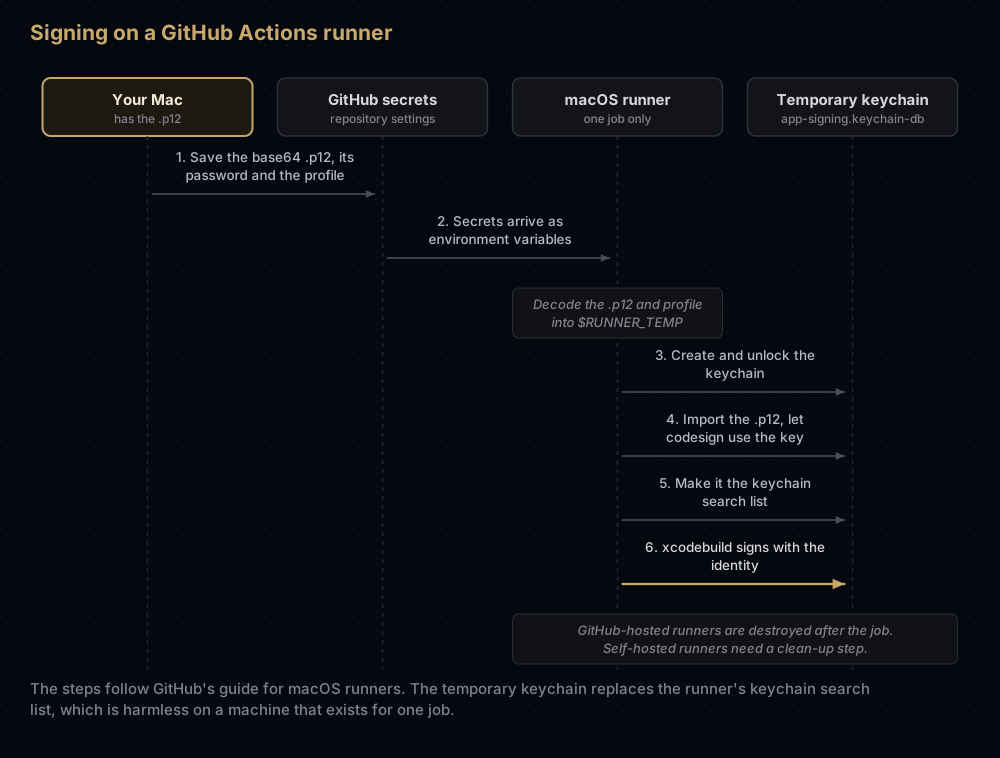
GitHub's own guide, "Installing an Apple certificate on macOS runners for Xcode development", uses exactly this pattern. The commands below follow it. Every security command in it was run against a throwaway keychain on macOS 26.5 while writing this post, apart from the search-list line, for a reason explained below.
Step 1: turn the files into secrets
Secrets hold text, so encode the binary files as base64 first. GitHub's guide copies the result straight to the clipboard:
base64 -i BUILD_CERTIFICATE.p12 | pbcopyOr write it to a file and upload it with the GitHub CLI:
base64 -i BUILD_CERTIFICATE.p12 -o BUILD_CERTIFICATE.base64
gh secret set BUILD_CERTIFICATE_BASE64 < BUILD_CERTIFICATE.base64
In the web interface, secrets live under the repository's Settings > Secrets and variables > Actions, then New repository secret. GitHub's example uses four:
| Secret | What it holds |
|---|---|
BUILD_CERTIFICATE_BASE64 | The .p12, base64-encoded |
P12_PASSWORD | The password you chose when exporting |
BUILD_PROVISION_PROFILE_BASE64 | The provisioning profile, base64-encoded |
KEYCHAIN_PASSWORD | Any new random string, used only for the runner's temporary keychain |
Things GitHub's documentation points out about secrets:
- Each secret can be up to 48 KB. A signing
.p12is small. The throwaway one made for this post was 2.6 KB, or 3.5 KB as base64. - Base64 is not encryption. It only turns binary into text. The protection comes from the secret store and the
.p12password. - Workflows triggered from forks do not receive secrets (apart from
GITHUB_TOKEN), so a signing step cannot work on pull requests from forks.
Delete the local .base64 file once the secret is saved.
Step 2: install the certificate on the runner
This is GitHub's example step, unchanged apart from the comments:
- name: Install the Apple certificate and provisioning profile
  env:
    BUILD_CERTIFICATE_BASE64: ${{ secrets.BUILD_CERTIFICATE_BASE64 }}
    P12_PASSWORD: ${{ secrets.P12_PASSWORD }}
    BUILD_PROVISION_PROFILE_BASE64: ${{ secrets.BUILD_PROVISION_PROFILE_BASE64 }}
    KEYCHAIN_PASSWORD: ${{ secrets.KEYCHAIN_PASSWORD }}
  run: |
    # file paths on the runner
    CERTIFICATE_PATH=$RUNNER_TEMP/build_certificate.p12
    PP_PATH=$RUNNER_TEMP/build_pp.mobileprovision
    KEYCHAIN_PATH=$RUNNER_TEMP/app-signing.keychain-db

    # decode the secrets back into files
    echo -n "$BUILD_CERTIFICATE_BASE64" | base64 --decode -o $CERTIFICATE_PATH
    echo -n "$BUILD_PROVISION_PROFILE_BASE64" | base64 --decode -o $PP_PATH

    # create a temporary keychain
    security create-keychain -p "$KEYCHAIN_PASSWORD" $KEYCHAIN_PATH
    security set-keychain-settings -lut 21600 $KEYCHAIN_PATH
    security unlock-keychain -p "$KEYCHAIN_PASSWORD" $KEYCHAIN_PATH

    # import the certificate and key, and let codesign use the key
    security import $CERTIFICATE_PATH -P "$P12_PASSWORD" -A -t cert -f pkcs12 -k $KEYCHAIN_PATH
    security set-key-partition-list -S apple-tool:,apple: -k "$KEYCHAIN_PASSWORD" $KEYCHAIN_PATH
    security list-keychain -d user -s $KEYCHAIN_PATH

    # install the provisioning profile
    mkdir -p ~/Library/MobileDevice/Provisioning\ Profiles
    cp $PP_PATH ~/Library/MobileDevice/Provisioning\ Profiles
Put your build step after it. For a macOS app, GitHub notes that the profile ends in .provisionprofile instead of .mobileprovision.
What each line does
| Command | What it does, per the security manual |
|---|---|
base64 --decode -o | Turns the secret text back into the original file |
create-keychain -p | Creates a new keychain file with the given password |
set-keychain-settings -lut 21600 | Locks the keychain when the machine sleeps (-l) and after a timeout (-u) of 21,600 seconds, which is six hours (-t) |
unlock-keychain -p | Opens the keychain with its password, so the import and the build can use it |
import … -P … -t cert -f pkcs12 -k | Imports the .p12 with its password into that keychain. The certificate and the key both arrive |
-A | Lets any application use the imported key without a warning. The manual calls this insecure; on a runner that is thrown away after the job, it avoids prompts nobody can answer. -T /usr/bin/codesign is the narrower alternative |
set-key-partition-list -S apple-tool:,apple: -k | Changes the key's partition list, which needs the keychain password. The manual says apple: must be in the list for /usr/bin/codesign to use the key |
list-keychain -d user -s | Sets the user's keychain search list to this keychain, so Xcode and codesign find the identity. The manual spells it list-keychains; both spellings are accepted |
cp … Provisioning Profiles | Installs the profile. Xcode 16 keeps downloaded profiles in a new folder, but its release notes say it still loads them from this older location |
The search-list line is the one not to try on your own Mac. -s replaces the whole list, so running it there would drop your login keychain from the search list. On a runner that exists for one job, that does not matter.
Two errors are worth recognising:
- A wrong
P12_PASSWORDmakes the import fail withSecKeychainItemImport: The user name or passphrase you entered is not correct. - A
.p12without the key imports cleanly, and signing fails later because no identity exists. Check withsecurity find-identity -p codesigning "$KEYCHAIN_PATH"right after the import: "0 identities found" means the key is missing.
Step 3: clean up on self-hosted runners
GitHub-hosted runners are virtual machines destroyed at the end of the job, so the keychain and profile go with them. On a self-hosted runner, $RUNNER_TEMP is cleaned, but the keychain and the installed profile can remain. GitHub's guide adds a final step:
- name: Clean up keychain and provisioning profile
  if: ${{ always() }}
  run: |
    security delete-keychain $RUNNER_TEMP/app-signing.keychain-db
    rm ~/Library/MobileDevice/Provisioning\ Profiles/build_pp.mobileprovision
On a self-hosted Mac that someone also uses day to day, remember that the search-list line replaced their list too.
When a single .p12 stops scaling
One exported .p12 in one repository's secrets is fine for a small team. Once several apps, several developers and yearly renewals are involved, keeping every copy in step becomes the real work. That is the problem fastlane match exists to solve. If your team distributes from the Xcode Organizer, Apple's cloud-managed certificates remove the need to export at all.
Common mistakes
- Exporting only the certificate. The import looks fine and nothing can sign. Expand the certificate and select the key too.
- Looking for the key on the wrong Mac. Only the Mac that made the request, or one that imported a
.p12, has it. - Sending the file and the password together. Use two channels, as Apple suggests.
- Committing the
.p12or its base64 text to a repository. Keep both in a secret store. - Forgetting the password. The file cannot be imported without it. Export again from a Mac that has the key.
- Running the CI search-list command on your own Mac. It replaces your keychain search list.
- Importing a certificate that the provisioning profile does not contain. The identity is fine, but signing still fails until the profile matches.
- Expecting OpenSSL 3 to open a macOS export. Add
-legacy.
Questions people ask
How do I export a .p12 file from Keychain on a Mac?
In Keychain Access, open My Certificates, expand your certificate, select it and its private key, then choose File > Export Items. Pick Personal Information Exchange (.p12), save, and set a password.
How do I add a .p12 certificate to Keychain?
Double-click the file and enter its password; Keychain Access imports it into your login keychain. Or use File > Import Items and choose the destination keychain.
Why is Export Items greyed out in Keychain Access?
Apple's guide says the menu is dimmed when at least one selected item cannot be exported. Select only the certificate and its private key, from My Certificates.
Why doesn't my imported .p12 show up in Xcode?
Most often the file held the certificate without its private key. Run security find-identity -p codesigning. If the certificate is missing from that list, export again from the Mac that has the key, with the key selected.
What password should a .p12 have?
One you choose at export time. Apple recommends a strong one, shared separately from the file. In CI, it goes into its own secret.
Is it safe to keep a .p12 in GitHub secrets?
GitHub's guide recommends secrets for exactly this. Keep the .p12 password in a separate secret, remember that base64 is only encoding, and note that workflows from forks do not receive secrets.
Can OpenSSL open a .p12 exported from a Mac?
Yes, with -legacy. Files written by macOS's own tools use older encryption that OpenSSL 3 does not load by default.
Do I need to export anything if we use cloud-managed certificates?
No. Apple's documentation says Xcode creates and shares cloud-managed certificates among the team automatically, so there is nothing to export for them.
Keep reading
- fastlane match: one encrypted set of certificates and profiles for the whole team and CI.
- Missing private key in Xcode: when the Mac you are on never had the key.
- How to create a certificate signing request on a Mac: where the private key comes from.
- Converting signing files:
.p12to PEM and back. - Flutter iOS code signing: from first run to TestFlight.