To create a certificate signing request (CSR) on a Mac, open Keychain Access and choose Keychain Access > Certificate Assistant > Request a Certificate From a Certificate Authority. Enter your email address and a name for the key, leave the CA email address empty, choose Saved to disk, and click Continue. You get a .certSigningRequest file to upload to Apple's developer portal.
The file itself holds nothing secret. While making it, Keychain Access also creates a private key and keeps it in your login keychain. The certificate Apple sends back only works together with that key, so the Mac you make the request on is the Mac that can sign with the certificate.
The rest covers what the request is, each field, where the key ends up, how to make a CSR on Linux or Windows with OpenSSL, and the mistakes that lead to "missing private key" later.
What a CSR is, in plain words
A certificate is an ID card that Apple issues. A CSR is the application form.
When you fill in the form, your Mac first makes a matching pair of keys. One is private: it signs things, and it never leaves your Mac. The other is public: it can only check signatures, so it is safe to hand out. The form carries the public key, your email address and a name, and it is signed with the private key so Apple can tell the two belong together. Apple reads the form, adds its own signature, and returns the finished ID card as a .cer file.
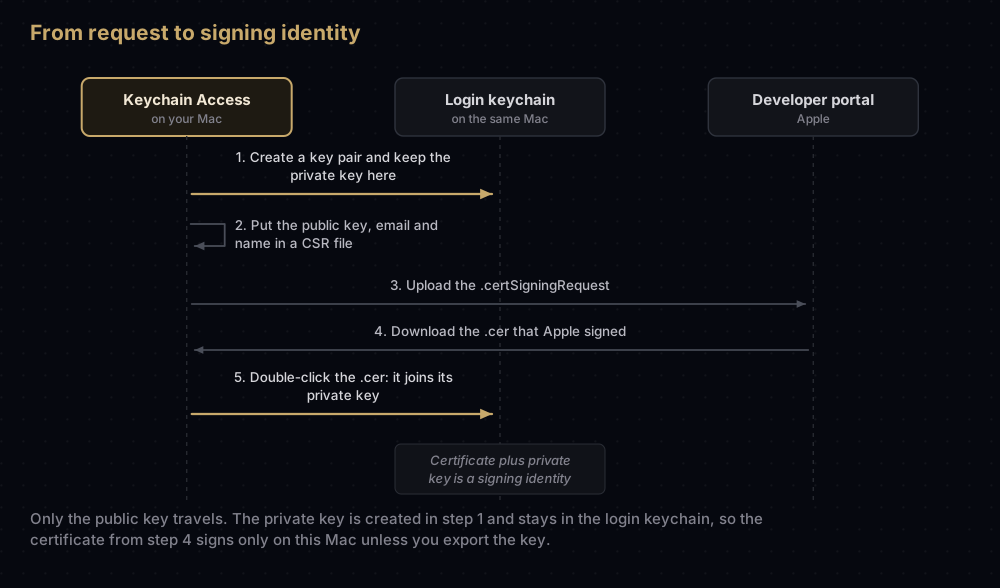
Apple's code signing technote describes the same two actions: the request creates a key pair in your login keychain, and wraps the public key in a CSR that you save to a file. The key never travelling is the point. As long as nobody else has it, nobody else can sign code as you.
The analogy stops at one place. A real ID card is useful on its own. A signing certificate is not: without its private key it cannot sign anything, which is the whole story behind "I downloaded the certificate on my new Mac and it doesn't work".
Step by step in Keychain Access
1. Open Keychain Access
Search for Keychain Access in Spotlight and press Return. That is what Apple's current Keychain Access User Guide says to do.
Apple's developer help still says the app is in the Utilities folder. On recent macOS it is not there any more: on macOS 26, where these steps were checked, it lives in /System/Library/CoreServices/Applications, and everyday passwords are managed in the separate Passwords app. Keychain Access still handles certificates and keys, and Spotlight finds it wherever it lives.
2. Open Certificate Assistant
In the menu bar, choose Keychain Access > Certificate Assistant > Request a Certificate From a Certificate Authority.
If the menu item instead reads "Request a Certificate From a Certificate Authority With" followed by a name, something is selected in the Keychain Access window. Apple's steps use the plain item, so click an empty part of the list and open the menu again.
3. Fill in the form
| Field | What to enter | Why |
|---|---|---|
| User Email Address | Your email address | Apple's steps ask for one. Use an address you would recognise later |
| Common Name | A name for the key, such as "Example Developer Dev Key" | Apple's help describes this as a name for the key. It is how you will find the private key in Keychain Access later |
| CA Email Address | Leave it empty | You are not emailing the request anywhere |
| Request is | Saved to disk | You upload the file to the portal yourself |
| Let me specify key pair information | Leave it unticked for app signing | Needed only for special cases, below |
Pick a Common Name you will recognise in a year's time, when the certificate is due for renewal. Something with your name, the team and the purpose ("Example Developer, Example Team, distribution") saves a lot of guessing.
Click Continue.
4. Save the file
Choose where to save it. The file ends in .certSigningRequest. When the assistant finishes, its last page offers Show In Finder, and Done closes it.
5. Upload it to Apple
In the developer portal, open Certificates, Identifiers & Profiles, choose Certificates in the sidebar, then the add (+) button. Pick the certificate type, click Continue, then Choose File and select your .certSigningRequest. Click Continue, then Download.
Double-click the downloaded .cer file. Keychain Access adds it to your keychain, and it appears under My Certificates with the private key tucked underneath it. That pairing is what Xcode calls a signing certificate and what Apple's technote calls a digital identity.
Not sure which type to pick? Every certificate in Apple's developer portal explains all twenty.
When to tick "Let me specify key pair information"
For development, distribution and most services certificates, leave it unticked. Two cases need it:
- Apple Pay Payment Processing certificates. Apple's help says to choose ECC and a 256-bit key pair. If you work with a payment provider, ask them for the CSR instead; they create it on their side. (Apple adds that Payment Processing certificates for mainland China do not need a specific key pair.)
- Custom RSA sizes. The assistant lets you choose the algorithm and key size. Apple's Keychain Access guide says it can create RSA keys up to 4096 bits, and that keys smaller than 2048 bits are no longer supported.
App License Delivery certificates, used by alternative app marketplaces, need RSA 3072-bit keys, and Apple's help makes those in Terminal instead of Keychain Access.
Where the private key ends up
The private key goes into your login keychain, named after the Common Name you typed. To see it, select the login keychain in Keychain Access and open the Keys view.
After you import the .cer, you can check that the certificate found its key:
security find-identity -v -p codesigningEach line it prints is a valid code signing identity: a certificate with its private key present in your keychains. A certificate you downloaded on the wrong Mac will not be listed.
Treat that key like the original of a house key:
- Do not delete it. Keychain Access warns that if a private key is deleted, certificates associated with it can no longer be used. It means it.
- Back it up. Export the certificate and key together as a password-protected
.p12, as described in exporting a .p12 from Keychain, and store it somewhere safe. - Do not share the backup casually. Anyone with the
.p12and its password can sign software as your team.
Why the Mac you use matters
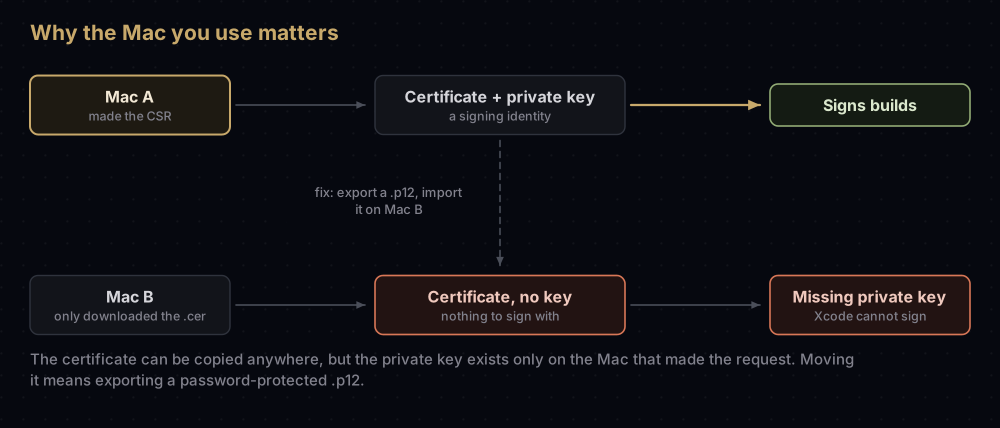
Apple never had your private key, so the portal cannot give it back to you. Only the Mac that made the request has it. So:
- Make the request on the Mac that will sign, or be ready to export the key from it.
- Think twice before using a borrowed Mac, a short-lived cloud Mac or a virtual machine that will be wiped. The key disappears with it.
- Moving to a new Mac? Apple's Keychain Access guide says Setup Assistant transfers your keychains, but its code signing technote still gives migrating to a new Mac as an example of how a signing key gets lost. Export a
.p12before you switch, whichever route you take. - On more than one team? Apple says to use a new CSR for each team, so that each team's certificate has its own private key.
If the key is already gone, missing private key in Xcode walks through the fixes.
What each file holds
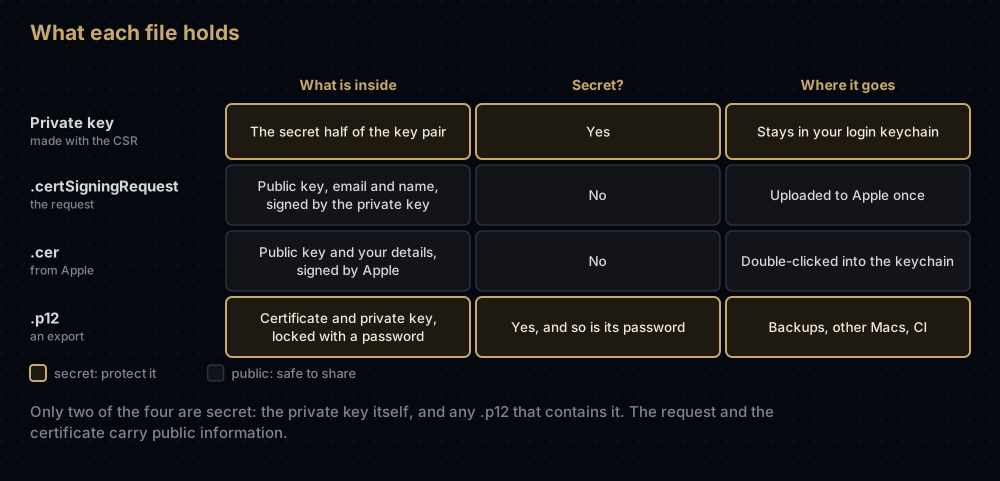
Once the certificate is issued, you do not need the CSR any more. The private key is the thing to protect.
Making a CSR without a Mac
Keychain Access is only on macOS. On Linux, or on Windows in a shell that has OpenSSL, you can make the same kind of request from the command line. The certificate you get back is the same kind of certificate. The difference is that the private key is a file on disk instead of an item in a keychain, so you have to protect it yourself.
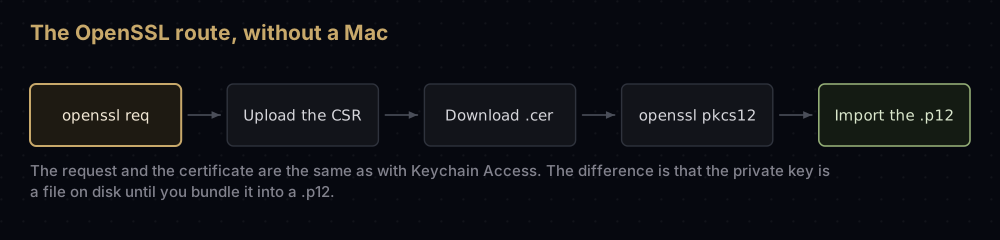
Step 1: make a key and a CSR. This creates a 2048-bit RSA key, the smallest size Keychain Access still supports, and a request carrying your email address, a name and a country code:
openssl req -new -newkey rsa:2048 -noenc \
  -keyout apple_dev.key \
  -out apple_dev.certSigningRequest \
  -subj "/emailAddress=you@example.com/CN=Example Developer/C=US"
-noenc writes the key without a passphrase. It is the OpenSSL 3 spelling. Older OpenSSL versions and LibreSSL (the openssl that ships with macOS) only know -nodes, which OpenSSL 3 still accepts but marks as deprecated.
Check the request before you upload it:
openssl req -in apple_dev.certSigningRequest -noout -verify -subjectOpenSSL 3.6 answers "Certificate request self-signature verify OK" (LibreSSL says "verify OK"), followed by the subject you typed.
Step 2: upload and download. Upload apple_dev.certSigningRequest in the portal exactly as in step 5 above, and download the .cer.
Step 3: turn the certificate and key into a .p12. Apple's .cer is in the binary DER format, so convert it to PEM first, then bundle it with the key. OpenSSL asks you to choose an export password:
openssl x509 -inform der -in development.cer -out development.pem
openssl pkcs12 -export -inkey apple_dev.key -in development.pem -out apple_dev.p12
That .p12 can be imported on a Mac, or into a CI keychain with the security tool. In testing on macOS 26.5, security import accepted a .p12 made this way by OpenSSL 3.6 with its default settings. If a tool refuses the file, add -legacy to the pkcs12 command, which switches to the older encryption that older tools expect.
Then protect apple_dev.key. The certificate is public, so anyone who gets the key can sign as you. Keep it out of version control, and delete stray copies once the .p12 is stored safely.
Common mistakes
- Typing something into CA Email Address, or choosing "Emailed to the CA". Apple's steps leave the field empty and save the file to disk.
- Making the request on a machine you are about to lose. A wiped virtual machine or a returned laptop takes the private key with it.
- Deleting keys that look unused. A key with an unfamiliar Common Name may be the only copy behind a live distribution certificate.
- Reusing one CSR across teams. Apple asks for a new CSR per team.
- Uploading the wrong file. The portal wants the
.certSigningRequest, never the.keyor a.p12. - Using an RSA key for Apple Pay Payment Processing. That certificate needs an ECC 256-bit key.
- Leaving an OpenSSL key file lying around. Unlike a keychain item, nothing locks it.
Questions people ask
Does the CSR contain my private key?
No. It holds your public key, the email address and the name you typed, plus a signature made with the private key. The private key itself stays in your login keychain, or in the .key file if you used OpenSSL.
Where is the certificate signing request saved?
Wherever you chose in the save dialog. The assistant's last page has a Show In Finder button, and the file ends in .certSigningRequest.
What email address should I put in the CSR?
Apple's steps only ask for an email address. Use one you will recognise, and leave the CA Email Address field empty.
Can I create a CSR on Windows or Linux?
Yes. Use openssl req as shown above, upload the request, then combine Apple's .cer with your key into a .p12 using openssl pkcs12 -export.
Can I reuse the same CSR for several certificates?
Apple only spells out the rule for several teams: use a new CSR for each. Every certificate made from one CSR shares the same private key, so a fresh request per certificate keeps them independent.
Do I need a CSR if Xcode manages signing?
No. When Xcode creates a certificate for you, it makes the key and the request itself and stores the key in your login keychain. The same care about that Mac still applies.
Is a certificate signing request secret?
No. It carries only public information. The private key created alongside it is the secret part.
Why does Xcode say my certificate is missing its private key?
Usually because the certificate is on a Mac that did not make the request. Import a .p12 exported from the Mac that did, or revoke the certificate and make a new request on this Mac. For a shared distribution certificate, ask the team first, because revoking it affects everyone.
Keep reading
- Export a .p12 from Keychain: backing up the key, and moving it to another Mac or CI.
- Missing private key in Xcode: what to do when the key is already gone.
- Every certificate in Apple's developer portal: which type to pick after uploading your CSR.
- Converting signing files: moving between PEM, DER and
.p12.