
Ad Hoc distribution puts a test build of your iOS app on a fixed list of registered iPhones and iPads, with no App Store and no TestFlight involved. You register each device's ID with Apple, sign the build with an Apple Distribution certificate and an Ad Hoc provisioning profile that names those devices, then hand the .ipa file to your testers.
TestFlight is usually the better tool once you have more than a handful of testers, or testers outside your team. It needs no device IDs and takes up to 10,000 external testers, but its builds expire after 90 days and the first build you send to outside testers is reviewed by Apple. Ad Hoc suits a few known devices, a client demo, or a build you would rather not upload.
The next section explains the idea without jargon. The rest is the developer walk-through: device IDs, the profile, the export, installing, and the check-in Apple added in 2021.
Ad Hoc in plain words
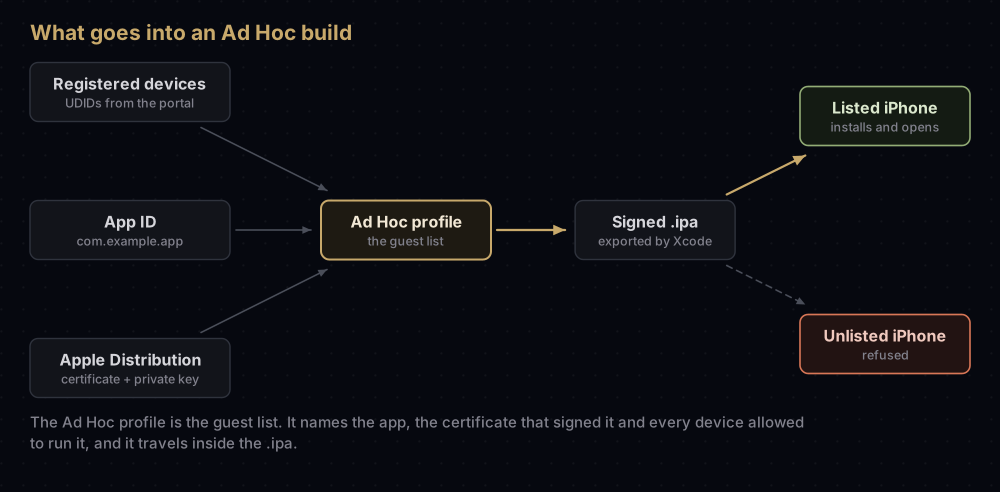
An iPhone only opens apps that Apple's system has vouched for. Apps from the App Store and TestFlight are covered because Apple delivers them. An Ad Hoc build has to carry its own permission slip: a provisioning profile, sealed inside the app, listing exactly which devices may run it.
Picture a private film screening with a printed guest list. The list is glued inside every ticket. A phone whose ID is on the list is let in. Any other phone is turned away at the door, even if someone forwards it the ticket.
The picture breaks in one useful place. You cannot add a name to tickets you have already handed out. Adding a device means updating the profile, exporting the build again, and sending the new file to everyone who should have it.
What you need before you start
| Piece | Why it matters | Where it lives |
|---|---|---|
| Apple Developer Program membership | The free tier has no access to Certificates, Identifiers & Profiles, so it cannot make Ad Hoc profiles | developer.apple.com → Account |
| An App ID matching your bundle ID | The profile is issued for one app | Portal → Identifiers |
| An Apple Distribution certificate and its private key | Ad Hoc builds are signed like release builds | Keychain Access on the Mac that signs |
| Registered devices | Only listed devices can run the build | Portal → Devices |
| An Ad Hoc provisioning profile | Ties the app, the certificate and the devices together | Portal → Profiles, or Xcode's automatic signing |
Registering devices and creating Ad Hoc profiles in the portal need the Account Holder or Admin role. If Xcode's automatic signing is on, it creates and updates the Ad Hoc profile for you. The profile itself is covered in depth in provisioning profiles explained, and the two certificate types in Apple Development vs Apple Distribution.
Step 1: collect and register device IDs
Every Apple device has a UDID, a unique device identifier. Your tester has to send you theirs, or you read it while the device is plugged into your Mac.
Ways to find it, from Apple's "Locating device identifiers" guide:
- Finder. Connect the iPhone, select it under Locations, and tap Trust on the phone if asked. Click the line of device details under the name until the UDID appears, then Control-click it and choose Copy UDID.
- Xcode's Device Hub (the device window in current Xcode). Select the device, open the Info inspector, and copy the UDID field under Hardware Properties. If the field is hidden, use Edit Visibility at the bottom of the inspector.
- A Mac you want to test on. System Settings → General → About → System Report → Hardware, and copy the Provisioning UDID. Apple asks for the provisioning UDID when you register an Apple silicon Mac.
To register one device, open Devices in Certificates, Identifiers & Profiles, click the add button, then choose the platform and enter a name and the UDID. For many devices, upload a file instead. Apple accepts two formats:
- a
.deviceidsfile exported from Apple Configurator (Actions → Export → Info → "List of Device Identifiers for Developer Portal") - a tab-delimited
.txtfile with one device per row: device ID, device name, platform name. The first row may hold headers; Apple ignores it.
With automatic signing, Xcode registers a connected device for you when you pick it as the run destination.
Device limits
Apple counts devices per product family, per membership year:
| Rule | Detail |
|---|---|
| Limit | 100 devices each for iPhone, iPad, Mac, Apple TV, Apple Watch, Apple Vision Pro and iPod touch |
| Disabling a device | Allowed, but it does not give the slot back |
| Freeing slots | At the start of a new membership year, Account Holders, Admins and App Managers are offered the chance to remove devices and reset the count to 100 |
| New memberships | Devices 11 to 100 can take 24 to 72 hours to be processed |
| After the membership lapses | Devices are removed automatically 180 days after expiry, unless you opted in to removal earlier |
So a registered slot is spent for the year, even for a tester who leaves after a week. That is the main cost of Ad Hoc, and a good reason to use TestFlight for larger or changing groups.
Step 2: create or refresh the Ad Hoc profile
In the portal, open Profiles, click the add button, and under Distribution choose Ad Hoc (or tvOS Ad Hoc). Then pick the App ID, one distribution certificate, and the devices this build should run on. Name the profile, click Generate, and download it.
When a new tester joins, register their device, open the profile, select the extra device, and click Save. Download the updated profile, export the app again, and send out the new .ipa. The old build still carries the old list, so it will not install on the new phone.
Apple's own page on registered devices puts it plainly: testers can run your app only on the devices you add to the provisioning profile.
Step 3: archive and export the build
In Xcode, choose a target and a device destination, then Product → Archive. The archive opens in the Organizer. Select it, click Distribute App, and pick a method.
| Organizer option | What it does |
|---|---|
| Release Testing | Apple's preset for this job: signs automatically, much like the App Store option, and exports for devices your team registered. Not offered for Mac apps |
| Custom → Ad Hoc | The same kind of export, with the options visible: App Thinning, and "Include manifest for over-the-air installation" |
| Debugging | Exports a development-signed build for registered devices. Apple's registered-devices guide uses this one, and suggests an Ad Hoc profile when you want to pick the devices yourself |
| Custom → Development | The development-signed equivalent, with the options visible |
Xcode then writes a folder containing the .ipa. Flutter's release guide notes that the same folder holds an ExportOptions.plist recording your choices, which you can reuse from the command line.
From the command line
xcodebuild exports an archive using that plist. The export method once called ad-hoc is now release-testing; xcodebuild -help lists ad-hoc as a deprecated alias.
<?xml version="1.0" encoding="UTF-8"?>
<!DOCTYPE plist PUBLIC "-//Apple//DTD PLIST 1.0//EN" "http://www.apple.com/DTDs/PropertyList-1.0.dtd">
<plist version="1.0">
<dict>
    <key>method</key>
    <string>release-testing</string>
    <key>teamID</key>
    <string>A1B2C3D4E5</string>
    <key>signingStyle</key>
    <string>manual</string>
    <key>signingCertificate</key>
    <string>Apple Distribution</string>
    <key>provisioningProfiles</key>
    <dict>
        <key>com.example.app</key>
        <string>Example Ad Hoc</string>
    </dict>
</dict>
</plist>xcodebuild -exportArchive \
-archivePath build/Example.xcarchive \
-exportPath build/adhoc \
-exportOptionsPlist ExportOptions.plistWith automatic signing, set signingStyle to automatic, drop the two manual keys, and add -allowProvisioningUpdates so xcodebuild may create or update the profile.
From Flutter
flutter build ipa --export-method ad-hocOn Xcode 15.4 and later, the Flutter tool quietly translates ad-hoc into release-testing before calling xcodebuild. One warning: the help text for this flag (flutter build ipa -h, Flutter 3.44.8) describes ad-hoc builds as being for devices that "do not need to be registered with the Apple developer account". Apple's documentation says the opposite, and Apple is the one that enforces it. Register the devices. The wider Flutter picture is in Flutter iOS code signing.
Step 4: install the build on test devices
There are two routes.
- Device Hub or Apple Configurator on a Mac. In Device Hub, select the connected device, open the Apps inspector, click the add button and choose the
.ipa. Apple Configurator does the same from its own window. - Over the air. Tick "Include manifest for over-the-air installation" when exporting (the
manifestkey inExportOptions.plist), then host the.ipaand the manifest on an HTTPS server and link to it with anitms-services://address. Apple documents the web server side in its guide to distributing in-house apps.
Apple's registered-devices guide also tells testers to turn on Developer Mode before running an app installed from an .ipa: Settings → Privacy & Security → Developer Mode, then restart and confirm.
The first-launch check-in
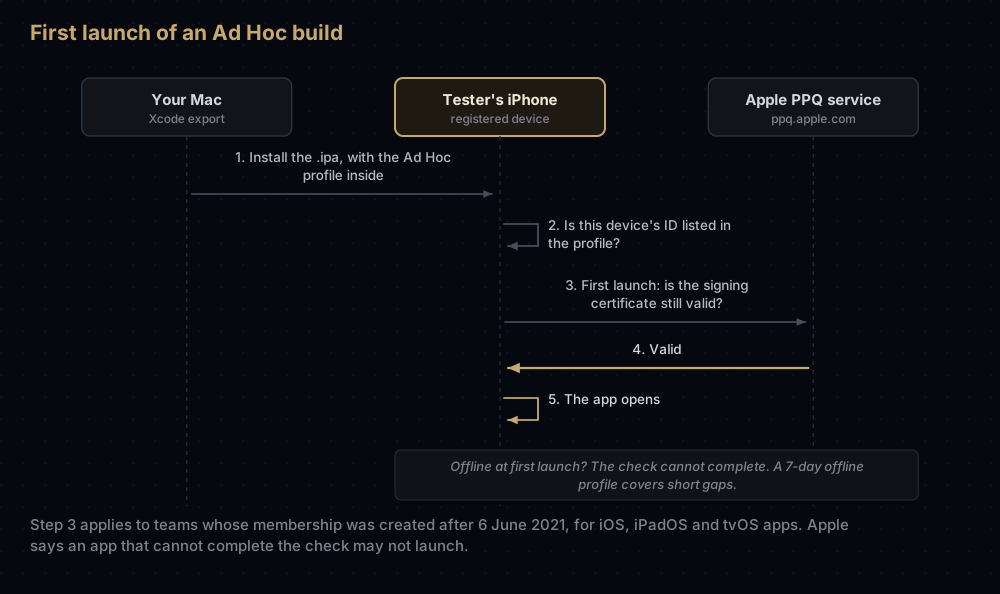
Apple changed the rules for teams whose membership was created after 6 June 2021. On those teams, development-signed and Ad Hoc builds for iOS, iPadOS and tvOS check in with an Apple service (PPQ) the first time they launch, to confirm the signing certificate is still valid.
What that means in practice:
- The device must be online the first time the app opens.
- Behind a firewall, allow connections to
https://ppq.apple.com. - If the check cannot complete, Apple says the app may not launch.
- For short spells off the network, the portal offers an offline development or Ad Hoc profile, valid for 7 days, as an option while you create the profile. The option appears only for teams created after that date.
- If an app must run offline for more than 30 days after its first launch, Apple has a request form for extended offline validity.
When an Ad Hoc build stops opening
| What happened | Effect |
|---|---|
| The Ad Hoc profile expired | The build stops opening on test devices. A profile never outlives the certificate inside it |
| The distribution certificate was revoked | fastlane's documentation warns that Ad Hoc builds stop working once match nuke has revoked the certificates behind them. Build again with a new certificate |
| The device is not in the profile | The build will not install. Add the device, save the profile, export again |
| The phone was offline at first launch (post-2021 team) | The app may not launch until the check-in succeeds |
If testers report "it stopped working", check the profile's expiry first. security cms -D -i profile.mobileprovision prints the profile as text, including its expiry date and device list. Adding a capability to the App ID also invalidates existing profiles, so regenerate before the next export.
Ad Hoc or TestFlight?
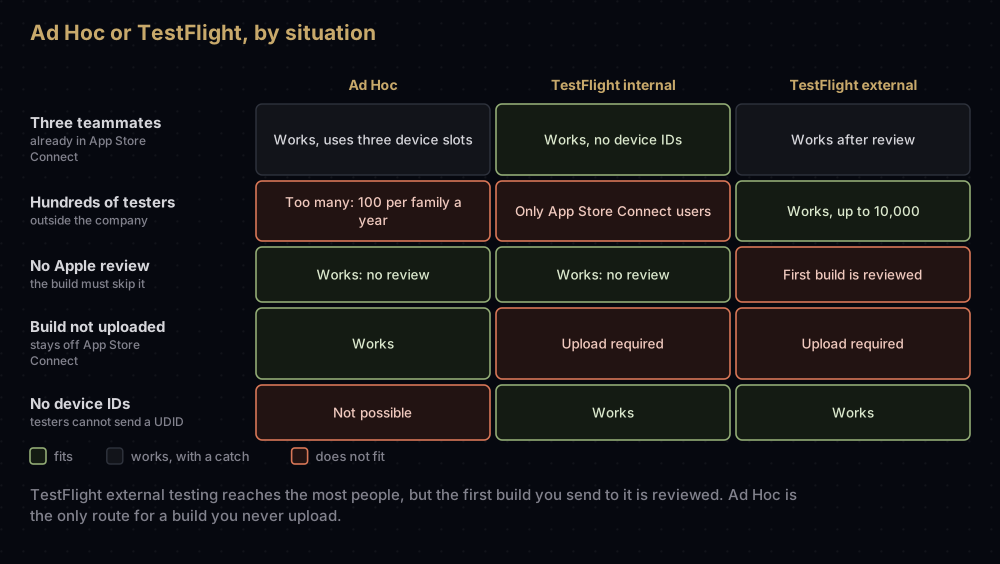
TestFlight is Apple's beta service inside App Store Connect. You upload the build, testers install the free TestFlight app, and Apple handles delivery. Here is how the two compare, using the figures on Apple's App Store Connect Help pages.
| Ad Hoc | TestFlight, internal | TestFlight, external | |
|---|---|---|---|
| Who can test | Anyone whose registered device is in the profile | Up to 100 App Store Connect users on your team | Up to 10,000 people per app |
| Device IDs needed | Yes, every device | No | No |
| Uses up device slots | Yes, for the membership year | No | No |
| Apple review | None | None | First build goes to TestFlight App Review; later builds of the same version might not need a full review |
| How long a build works | Until the profile or certificate expires or is revoked | 90 days | 90 days |
| How testers install | .ipa via a Mac, or a web link | TestFlight app | TestFlight app, by email invite or public link |
| Must be uploaded to App Store Connect | No | Yes | Yes |
A few more TestFlight details that affect the choice:
- Internal testers need one of these App Store Connect roles: Account Holder, Admin, App Manager, Developer or Marketing.
- A public link can be capped at any number from 1 to 10,000 testers, and filtered by device and OS version.
- You must create an internal group before you can create an external one.
- Up to six builds can be sent to TestFlight App Review in 24 hours, and only one build of each version can be in review at a time.
- A build uploaded as TestFlight Internal Only can never go to external testers or the App Store.
- Testers receive thinned variants of the app, sized for their device.
Common mistakes
- Forgetting to re-export after adding a device. Saving the profile is not enough. The build carries the profile it was signed with.
- Registering devices you only need for a week. The slot stays used until the membership year ends. Use TestFlight for short-lived or large groups.
- Using the wrong certificate. Ad Hoc needs Apple Distribution. A development certificate goes with a development profile, not an Ad Hoc one.
- Wrong push environment. Ad Hoc builds use APNs production, like TestFlight. A device token collected from a debug build will not work with them.
- Testing offline on a newer team. The first launch needs to reach Apple. Use the 7-day offline profile if you know the network will be missing.
- Registering the wrong Mac ID. Apple silicon Macs need the provisioning UDID from System Information.
- Trusting the Flutter help text about registration. Register the devices anyway.
- Mixing up Ad Hoc and in-house. Enterprise in-house distribution is a different program with its own certificate, and it is the one behind the "Untrusted Enterprise Developer" prompt.
Questions people ask
What is the difference between Ad Hoc and TestFlight?
Ad Hoc builds install directly on devices you registered by ID, with no upload and no review, up to 100 devices per product family a year. TestFlight builds are uploaded to App Store Connect, installed through the TestFlight app, need no device IDs, and expire after 90 days. External TestFlight testing also needs Apple's review for the first build.
How many devices can I use for Ad Hoc distribution?
Up to 100 per product family (iPhone, iPad, Mac and so on) per membership year. Disabling a device does not free its slot; you can clear the list when the membership renews.
Does an Ad Hoc build need to be reviewed by Apple?
No. Apple's registered-devices guide describes Ad Hoc as a way to reach known devices without beta app review. TestFlight internal testing also has no review; external testing does.
Why does my Ad Hoc app not install on a new tester's phone?
Their device ID is not in the profile the build was signed with. Register the device, add it to the Ad Hoc profile, export the app again and send the new file.
Can testers install an Ad Hoc build without a Mac?
Yes, over the air. Export with a manifest, host the .ipa and manifest on an HTTPS server, and give testers an itms-services:// link. The device still has to be in the profile.
Do Ad Hoc builds use the APNs sandbox or production?
Production, the same as TestFlight and the App Store. The sandbox is for builds signed with a development profile, such as the ones Xcode installs while you debug.
Why does my Ad Hoc app not open without internet?
If your developer team was created after 6 June 2021, the app checks in with Apple on first launch. Connect the device once, or create a 7-day offline profile.
Can I use Ad Hoc with a free Apple account?
No. The free tier has no access to Certificates, Identifiers & Profiles, so there is no way to register devices or create an Ad Hoc profile. Free provisioning only runs apps from Xcode, and those builds expire after 7 days.
Sources
Every figure above comes from Apple's own pages, read in September 2026:
- Distributing your app to registered devices and Distributing your app for beta testing and releases
- Devices overview and Create an ad hoc provisioning profile
- Provisioning profile updates, for the 2021 check-in
- TestFlight overview and Invite external testers
Keep reading
- Provisioning profiles explained: what the profile inside an Ad Hoc build contains, and why builds fail.
- Apple Development vs Apple Distribution certificates: which certificate signs which kind of build.
- Flutter iOS code signing: from the first
flutter runto a TestFlight upload. - fastlane match: regenerating Ad Hoc profiles automatically when devices change.
- When an Apple certificate expires or is revoked: what else stops working.