Signing a Flutter app for Google Play takes three pieces: an upload keystore made with keytool, a key.properties file that stores its path and passwords, and a signing configuration in android/app/build.gradle.kts that reads that file. With those in place, flutter build appbundle produces a signed bundle ready for Play Console.
Until you add that configuration, a new Flutter project signs release builds with the debug key, so that flutter run --release works out of the box. Google Play does not accept apps signed with a debug certificate, which is why this setup is the first thing to do before a first upload.
The steps below follow Flutter's own deployment guide as it stood on 17 September 2026 (written for Flutter 3.47.2), including its switch to Kotlin build files.
What you are setting up
The key you create here is your upload key. You sign bundles with it, and Google checks that each upload came from you. Google then signs the APKs that people install with a separate app signing key that it keeps. The Play App Signing post explains that split; for this post, the point is that your keystore proves who you are to Play, and nothing more.
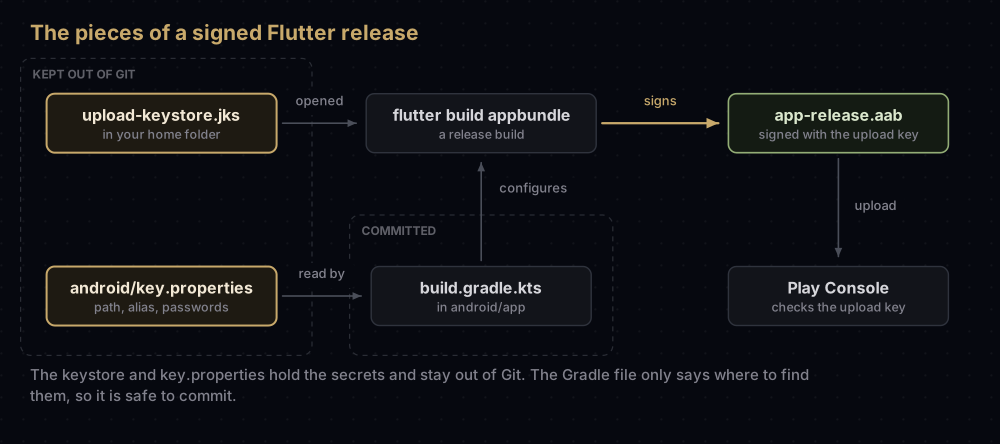
| File | What it holds | Commit it? |
|---|---|---|
upload-keystore.jks | Your private upload key and its certificate | Never |
android/key.properties | The keystore's path, alias and two passwords | Never |
android/app/build.gradle.kts | Instructions that read key.properties and sign release builds | Yes. It contains no secrets |
Step 1: create the upload keystore
If the app is already on Google Play, stop here and find the keystore you used before. Play checks every upload against the upload key it has on record, so a new key will not be accepted. If the old one is really gone, follow the upload key reset instead.
For a new app, this is the command from Flutter's guide for macOS and Linux:
keytool -genkey -v -keystore ~/upload-keystore.jks -keyalg RSA \
  -storetype JKS -keysize 2048 -validity 10000 -alias upload
And for Windows, in PowerShell:
keytool -genkey -v -keystore $env:USERPROFILE\upload-keystore.jks `
  -storetype JKS -keyalg RSA -keysize 2048 -validity 10000 `
  -alias upload
What each part does:
| Option | Meaning |
|---|---|
-genkey | Create a key pair. Newer keytool documentation calls this -genkeypair; both names still work |
-v | Print details as it works |
-keystore ~/upload-keystore.jks | Where to write the file. Your home folder keeps it outside the project |
-keyalg RSA, -keysize 2048 | A 2048-bit RSA key, the minimum Play accepts for an upload key |
-storetype JKS | Use the JKS format rather than PKCS12 |
-validity 10000 | Valid for 10,000 days, about 27 years. Play requires validity past 22 October 2033 |
-alias upload | The name of the key inside the file |
keytool then asks for a keystore password, your name and organisation (these go into the certificate and are not shown in the app), and finally a key password. Press Return at that last prompt to reuse the keystore password, which keeps things simple.
If keytool is not found, it is not on your PATH. It ships with the Java that Android Studio bundles. Run flutter doctor -v, find the path printed after "Java binary at:", and use the same folder with keytool in place of java.
About -storetype JKS. Flutter's guide notes that the flag is only needed on Java 9 or newer, because those versions create PKCS12 keystores by default. With the flag, keytool adds a warning recommending PKCS12. That is advice, not an error, and the keystore works. If you leave the flag out, you get a PKCS12 file, and then the key password must equal the store password, because PKCS12 does not support separate ones. The .jks post explains the difference.
Step 2: create key.properties
Create android/key.properties in your project (next to android/app/, not inside it):
storePassword=your-keystore-password
keyPassword=your-key-password
keyAlias=upload
storeFile=/Users/you/upload-keystore.jks
A few details matter here:
storeFilepath. Use the full path to the keystore. On Windows, Flutter's guide asks for double backslashes, for exampleC:\\Users\\you\\upload-keystore.jks.- Relative paths are resolved by Gradle from the
android/app/folder, because the build file uses Gradle'sfile()function there.storeFile=upload-keystore.jksmeansandroid/app/upload-keystore.jks. - Keep it private. A new Flutter project's
android/.gitignorealready listskey.properties,**/*.jksand**/*.keystore. Check that yours does before your first commit, especially in a project someone else created.
Step 3: configure Gradle
Flutter's guide now edits android/app/build.gradle.kts, the Kotlin DSL build file that current Flutter templates generate. Older projects may still have android/app/build.gradle, written in Groovy. Look in android/app/ to see which one you have, and use the matching version below. Mixing them fails, because the two languages have different syntax.
Kotlin DSL (build.gradle.kts)
Add the imports at the very top, load the properties before the android block, add a signingConfigs block before buildTypes, and point the release build type at it:
import java.util.Properties
import java.io.FileInputStream

plugins {
    // ... leave your existing plugins as they are
}

val keystoreProperties = Properties()
val keystorePropertiesFile = rootProject.file("key.properties")
if (keystorePropertiesFile.exists()) {
    keystoreProperties.load(FileInputStream(keystorePropertiesFile))
}

android {
    // ... your existing settings

    signingConfigs {
        create("release") {
            keyAlias = keystoreProperties.getProperty("keyAlias")
            keyPassword = keystoreProperties.getProperty("keyPassword")
            storeFile = keystoreProperties.getProperty("storeFile")?.let { file(it) }
            storePassword = keystoreProperties.getProperty("storePassword")
        }
    }

    buildTypes {
        release {
            signingConfig = signingConfigs.getByName("release")
        }
    }
}
The template's release block contains signingConfig = signingConfigs.getByName("debug") and a TODO comment about it. Replace that line with the "release" one above. If both lines stay, the last one assigned wins, and it is easy to reorder them by accident.
Groovy (build.gradle)
import java.util.Properties
import java.io.FileInputStream

plugins {
    // ... leave your existing plugins as they are
}

def keystoreProperties = new Properties()
def keystorePropertiesFile = rootProject.file('key.properties')
if (keystorePropertiesFile.exists()) {
    keystoreProperties.load(new FileInputStream(keystorePropertiesFile))
}

android {
    // ... your existing settings

    signingConfigs {
        release {
            keyAlias = keystoreProperties['keyAlias']
            keyPassword = keystoreProperties['keyPassword']
            storeFile = keystoreProperties['storeFile'] ? file(keystoreProperties['storeFile']) : null
            storePassword = keystoreProperties['storePassword']
        }
    }

    buildTypes {
        release {
            signingConfig = signingConfigs.release
        }
    }
}
What the code does
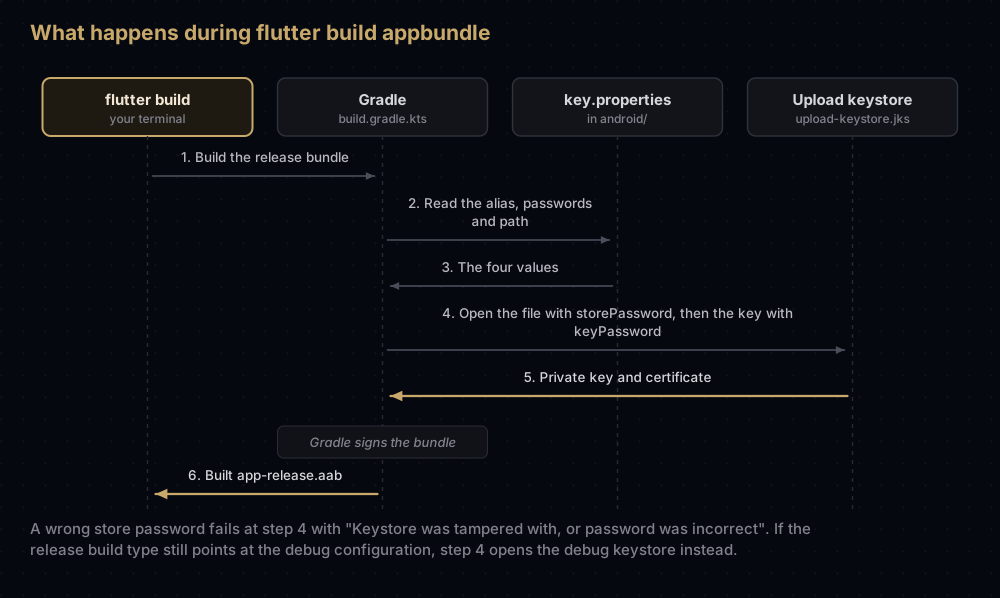
rootProject.file("key.properties") looks in android/, because that folder is the root of the Android build. The exists() check lets Gradle configure the project on a machine that has no key.properties, such as a teammate's who only runs debug builds. Flutter's guide adds that you may need to run flutter clean after changing the Gradle file, so that a cached build does not hide the change.
Step 4: build and check the signature
flutter build appbundleflutter build makes a release build by default. When it finishes, Flutter prints the path of the bundle. For a project without flavors, Flutter's build tool expects it at build/app/outputs/bundle/release/app-release.aab. (The deployment guide page shortens the name to app.aab, so go by the path Flutter prints.)
Before uploading, check which key signed it:
keytool -printcert -jarfile build/app/outputs/bundle/release/app-release.aabCompare the SHA-256 fingerprint with your keystore's:
keytool -list -v -keystore ~/upload-keystore.jks -alias uploadIf they match, the bundle is signed with your upload key. If the bundle's certificate instead matches the one in your debug keystore, the release build type is still pointing at the debug configuration. The debug keystore post shows how to read that one.
For stores that do not take app bundles, flutter build apk --split-per-abi builds one APK per processor type, signed with the same configuration.
Your keystore is not what users' phones see
After your first upload, Google generates the app signing key, and every APK installed from Play is signed with it. Two consequences for Flutter developers:
- Firebase, Google Sign-In and Maps need Google's fingerprints, copied from the Play app signing page in Play Console. The fingerprint of your upload keystore only covers release builds you install yourself. Getting this wrong is a common cause of Google Sign-In error 10 for Play installs, and this guide lists where each fingerprint comes from.
- Post-quantum signing is handled by Play. Flutter's guide now has a section on Android 17's APK Signature Scheme v3.2, which pairs a classical signature with an ML-DSA one. If you use Play App Signing, the guide says you can wait for Google Play to offer the upgrade, and nothing changes in your Gradle setup. New apps are already enrolled by default. The hybrid signing post covers what that means for fingerprints.
Signing in CI
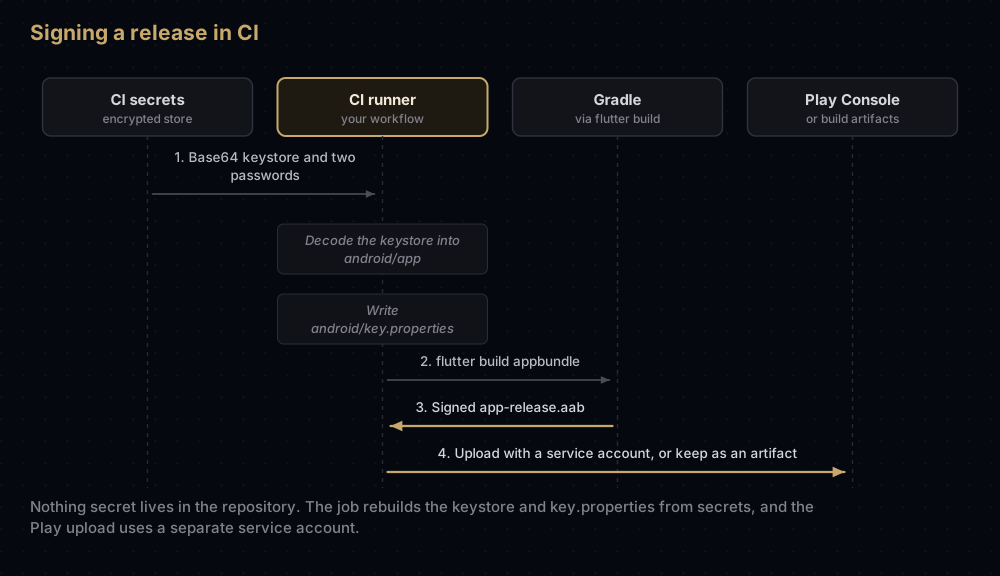
A build server needs the same three pieces, and none of them may be committed. The usual pattern is to store the keystore and its passwords as encrypted secrets, then recreate the files at the start of the job.
GitHub's documentation describes storing a binary file as a secret by encoding it as base64 first. On macOS:
base64 -i ~/upload-keystore.jks -o upload-keystore.base64On Linux, base64 -w 0 upload-keystore.jks > upload-keystore.base64 does the same. Paste the file's contents into a secret, and add the two passwords as separate secrets. GitHub's docs only suggest a workaround for secrets larger than 48 KB, and a 2048-bit upload keystore encodes to a few kilobytes, so it fits comfortably.
Then, in a GitHub Actions workflow, the signing part looks like this (the steps that install Flutter and check out the code come before it):
      - name: Restore the upload keystore
        env:
          UPLOAD_KEYSTORE_BASE64: ${{ secrets.UPLOAD_KEYSTORE_BASE64 }}
          UPLOAD_STORE_PASSWORD: ${{ secrets.UPLOAD_STORE_PASSWORD }}
          UPLOAD_KEY_PASSWORD: ${{ secrets.UPLOAD_KEY_PASSWORD }}
        run: |
          echo "$UPLOAD_KEYSTORE_BASE64" | base64 --decode > android/app/upload-keystore.jks
          cat > android/key.properties <<EOF
          storePassword=$UPLOAD_STORE_PASSWORD
          keyPassword=$UPLOAD_KEY_PASSWORD
          keyAlias=upload
          storeFile=upload-keystore.jks
          EOF

      - name: Build the app bundle
        run: flutter build appbundle
The relative storeFile works because Gradle resolves it from android/app/, where the first command wrote the keystore. The same idea carries over to GitLab, Bitrise, Codemagic or any other CI: secrets in, files written, build, and nothing printed to the log.
Two cautions. GitHub does not pass secrets (other than its own GITHUB_TOKEN) to workflows started from a fork, so pull requests from forks cannot build signed releases. And a CI secret is a copy for the build, not a backup: keep the original keystore and passwords somewhere you control, as the reset post describes.
Uploading the finished bundle to Play from CI uses a separate credential, a Play Console service account, not the keystore.
Common mistakes
- Leaving the debug signing line in place. The bundle is signed with the debug key, and Google Play will not accept it.
- Pasting Groovy into
build.gradle.kts(or Kotlin intobuild.gradle). Check which file your project has first. - Creating a new keystore for an app that is already on Play. Play only accepts uploads signed with the upload key it has on record.
- A wrong or single-backslash
storeFilepath on Windows. Use the full path with double backslashes. - Putting
key.propertiesin the wrong folder. It belongs inandroid/, next to theappfolder. - A wrong store password. The build reports
Keystore was tampered with, or password was incorrect. CheckstorePasswordfirst. - A PKCS12 keystore with a different
keyPassword. PKCS12 has one password, so setkeyPasswordto the same value asstorePassword. - Registering the upload key's SHA-1 in Firebase and expecting Play installs to work. Play installs are signed with Google's key.
- Committing the keystore or
key.properties. If that happens, treat the key as leaked and request an upload key reset. - Skipping
flutter cleanafter editing Gradle when the build still seems to use old settings.
Questions people ask
Where should I keep upload-keystore.jks in a Flutter project?
Outside the project is safest. Flutter's guide creates it in your home folder and points to it from key.properties. If you keep it inside android/, make sure .gitignore covers it.
Do I need -storetype JKS?
No. Flutter's guide uses it, and notes it only matters on Java 9 or newer. Without it you get a PKCS12 keystore, which also works, as long as the key password matches the store password.
Why is my Flutter release build signed with the debug key?
Because the template's release build type uses the debug signing configuration until you change it. Replace that line with signingConfigs.getByName("release").
Should I edit build.gradle or build.gradle.kts?
Whichever your project has in android/app/. New Flutter projects use build.gradle.kts. The syntax differs, so copy the matching example.
How do I get the SHA-1 for my Flutter release build?
For a build you signed yourself, run keytool -list -v on your upload keystore. For the app people install from Google Play, copy the fingerprints from the Play app signing page in Play Console.
How do I sign a Flutter app in GitHub Actions?
Store the keystore as a base64 secret and the passwords as separate secrets. At build time, decode the keystore, write key.properties, then run flutter build appbundle.
What happens if I lose the keystore?
If your app is on Play App Signing, which every app published as a bundle is, you can create a new key and request an upload key reset in Play Console.
Do I need to change anything for Android 17's post-quantum signing?
Not if you use Play App Signing. Your upload key and Gradle setup stay the same, and Play handles the hybrid signature.
Where this comes from
Checked on 17 September 2026:
- Build and release an Android app from the Flutter documentation (Flutter 3.47.2)
- Flutter's app template and build tool source, for the default signing line,
.gitignoreand bundle name - Sign your app from the Android Studio guide
- Using secrets in GitHub Actions from GitHub Docs
- Project.file() from the Gradle DSL reference
Keep reading
- Upload key vs app signing key: what Google keeps, and why.
- What's inside a .jks keystore: aliases, passwords, JKS and PKCS12.
- Resetting a lost upload key: what to do if the keystore is gone.
- Flutter iOS code signing: the other half of shipping a Flutter app.
- Finding each key's SHA-1 and SHA-256: the fingerprints Firebase and Maps ask for.