A Pass Type ID is the name you register with Apple for one kind of Apple Wallet pass, such as pass.com.example.tickets, and the Pass Type ID Certificate is the certificate that signs every pass of that kind. Wallet only accepts a pass signed with an Apple-issued certificate from your developer account, and the identifier written inside the pass has to match the certificate that signed it.
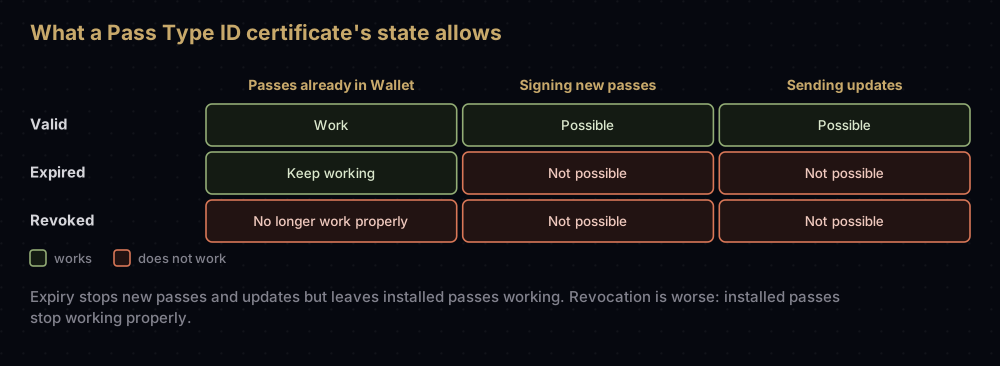
The same certificate has a second job: it sends the push notifications that tell Wallet a pass has changed, such as a new gate or a new balance. If it expires, passes already in people's Wallets keep working, but you can no longer sign new ones or send updates.
The plain-language picture comes first. The steps, the files inside a pass, the update service and the expiry rules follow.
A Wallet pass in plain words
Wallet holds boarding passes, event tickets, store and loyalty cards, coupons, and a general-purpose style for things like membership cards. Each pass is a small package of files: some text that says what is printed on the pass, a few images, and a seal.
Think of printed concert tickets with a holographic seal. The Pass Type ID is the name of the ticket series ("Example Events tickets"). The certificate is the machine that stamps the seal. Each ticket also has its own serial number. A ticket without a genuine seal is refused at the door, and a seal from another series does not count.
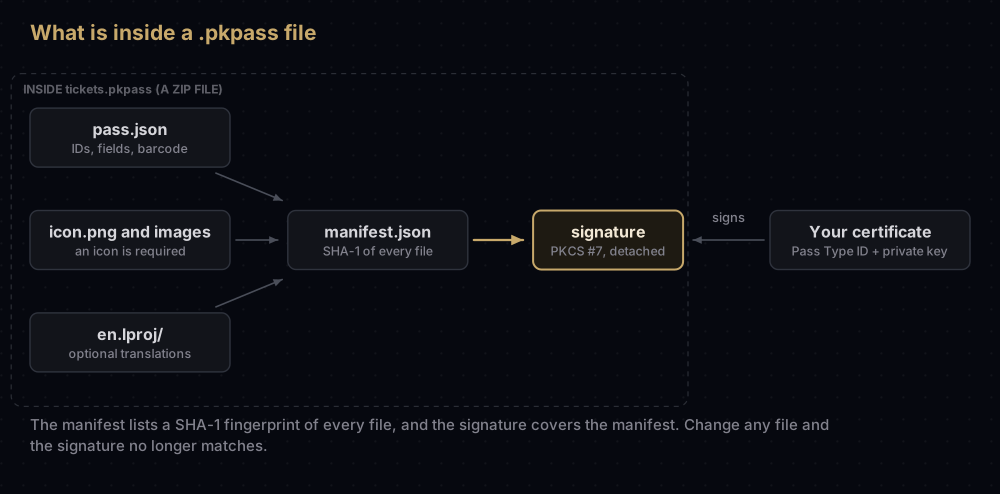
The analogy breaks in one way that matters. The seal does not sit on one corner of the ticket. A pass lists a fingerprint of every file inside it, and the seal covers that list, so changing any file, even one image, breaks the seal.
The parts, and who holds them
| Part | What it is | Secret? |
|---|---|---|
| Pass Type ID | The registered name of one group of passes, for example pass.com.example.tickets | No |
| Serial number | Identifies one pass in that group. The pair of identifier and serial number is unique | No |
| Pass Type ID Certificate | Issued by Apple after you upload a CSR. Signs passes and sends update pushes | No, but its private key is |
| Private key | Made on your Mac with the CSR, then exported as a .p12 for your server | Yes |
authenticationToken | A secret you put inside each pass, which Wallet sends back when it calls your update service | Yes |
| NFC PassKit Certificate | A separate certificate for passes that work with contactless readers | Its private key, yes |
Apple's rule on serial numbers is worth remembering: adding a pass with the same identifier and serial number as one already on the device replaces the old one. That is also how updates work.
Step 1: register the Pass Type ID
You need the Account Holder or Admin role.
- In Certificates, Identifiers & Profiles, open Identifiers and click the add button.
- Choose Pass Type IDs and click Continue.
- Enter a description and the identifier, a reverse-DNS string, then Continue and Register.
Apple's guide suggests one identifier per group of related passes, for example all the tickets for one kind of event. For the portal's other identifier types, see every identifier in Apple's developer portal.
Step 2: create the Pass Type ID Certificate
- Open Certificates and click the add button.
- Under Services, choose Pass Type ID Certificate and click Continue.
- Pick the Pass Type ID the certificate is for.
- Upload a certificate signing request made on your Mac (how to create a CSR).
- Click Continue, then Download. You get a
.cerfile.
Double-click the .cer so Keychain Access pairs it with the private key made alongside the CSR. To sign passes on a server, export the pair as a .p12 (exporting a .p12 from Keychain).
Pass Type ID certificates chain to Apple's WWDR G4 intermediate, the one used by the push family of certificates. Apple's certificate expiration page says that if you send passes or notifications with a certificate issued after 27 January 2022, you need the G4 intermediate. You can download it from Apple's certificate authority page as AppleWWDRCAG4.cer.
Passes that tap: the NFC certificate
A pass can carry an NFC payload so it works at contactless readers, like a loyalty card at a till. That needs more than the ordinary certificate. Apple's Wallet resources page lists a separate NFC PassKit Certificate "to sign your passes in Apple Wallet that provide contactless transactions with NFC terminals and readers", requested through a form that requires signing in. Apple does not publish the approval criteria on that page.
Inside the pass, NFC details live in an nfc object:
| Key | Required | What Apple says |
|---|---|---|
message | Yes | The payload sent to the terminal. No more than 64 bytes; longer messages are cut off |
encryptionPublicKey | Yes | A Base64-encoded X.509 SubjectPublicKeyInfo holding an ECDH P-256 public key |
requiresAuthentication | No | When true, the user must authenticate for each use. iOS 13.1 and later |
Step 3: build and sign the pass
A pass starts life as a folder, named after the pass with a .pass ending, holding pass.json, the images and any .lproj localisation folders. Every pass needs an icon: Apple uses it in notifications, including on the lock screen, and as the image for an email attachment.
pass.json
Six keys are required. The rest depend on the pass.
| Key | Required | Notes |
|---|---|---|
formatVersion | Yes | Must be 1 |
passTypeIdentifier | Yes | Must match the certificate that signs the pass |
teamIdentifier | Yes | The Team ID of the account that registered the identifier |
serialNumber | Yes | Unique within this Pass Type ID |
organizationName | Yes | Your organisation's name |
description | Yes | A short description used by accessibility features |
webServiceURL, authenticationToken | No | Turn on updates (Step 5) |
expirationDate, voided | No | Mark a pass as expired or used up |
A minimal event ticket:
{
  "formatVersion": 1,
  "passTypeIdentifier": "pass.com.example.tickets",
  "teamIdentifier": "A1B2C3D4E5",
  "serialNumber": "TICKET-0001",
  "organizationName": "Example Events",
  "description": "Ticket for the Example concert",
  "webServiceURL": "https://passes.example.com/",
  "authenticationToken": "REPLACE_WITH_A_LONG_RANDOM_SECRET",
  "eventTicket": {
    "primaryFields": [
      { "key": "event", "label": "EVENT", "value": "Example concert" }
    ]
  },
  "barcodes": [
    {
      "format": "PKBarcodeFormatQR",
      "message": "TICKET-0001",
      "messageEncoding": "iso-8859-1"
    }
  ]
}
Manifest, signature, package
Apple's signing steps, in order:
- Write
manifest.json: a dictionary of every file's path and its SHA-1 hash. - Make a PKCS #7 detached signature of
manifest.json, using the private key of the Pass Type ID certificate, and save it as a file namedsignature. - Zip the folder's contents.
- Rename the archive from
.zipto.pkpass.
Leave out stray files such as .DS_Store. Apple's older Wallet developer guide adds two details: include the WWDR intermediate certificate in the signature, and include the signing time.
These commands do all four steps with OpenSSL. They were tested with throwaway certificates; replace the file names with your own.
First, once per certificate, turn the .p12 and the WWDR G4 intermediate into PEM files. OpenSSL 3 may need -legacy to read older Keychain exports.
openssl pkcs12 -in pass.p12 -clcerts -nokeys -out pass-cert.pem
openssl pkcs12 -in pass.p12 -nocerts -nodes -out pass-key.pem
openssl x509 -inform DER -in AppleWWDRCAG4.cer -out wwdr.pem
Then, inside the pass folder, write manifest.json with the SHA-1 of every file except the manifest, the signature and .DS_Store:
cd tickets.pass
python3 -c '
import hashlib, json, pathlib
skip = {"manifest.json", "signature", ".DS_Store"}
files = sorted(p for p in pathlib.Path(".").rglob("*")
               if p.is_file() and p.name not in skip)
manifest = {str(p): hashlib.sha1(p.read_bytes()).hexdigest() for p in files}
pathlib.Path("manifest.json").write_text(json.dumps(manifest, indent=2))
'
Sign the manifest, with the intermediate included, and zip everything into the .pkpass:
openssl smime -binary -sign \
  -certfile ../wwdr.pem \
  -signer ../pass-cert.pem -inkey ../pass-key.pem \
  -in manifest.json -out signature -outform DER

zip -r ../tickets.pkpass . -x '*.DS_Store'
openssl smime -sign makes a detached signature unless told otherwise, and it records the signing time. Keep pass-key.pem as carefully as the .p12: it is the unencrypted private key.
To test, drag the .pkpass onto an iPhone running in Simulator. If the pass is valid, Wallet offers to add it.
Step 4: hand the pass to people
Apple lists three ways:
- In your app, show a
PKAddPassButtonand present aPKAddPassesViewControllerwhen it is tapped. - On a web page, show the Add to Apple Wallet badge and download the pass when it is clicked.
- By email, as an attachment.
People can add a pass without installing your app, and iCloud copies passes to all of a person's devices. To offer several at once, zip the .pkpass files and rename the archive .pkpasses; Apple allows up to 10 passes or 150 MB per bundle, served as application/vnd.apple.pkpasses.
The Wallet capability in Xcode is for apps that access the user's passes. It adds the com.apple.developer.pass-type-identifiers entitlement, a list of the pass types the app can access in Wallet.
Step 5: updating passes with push notifications
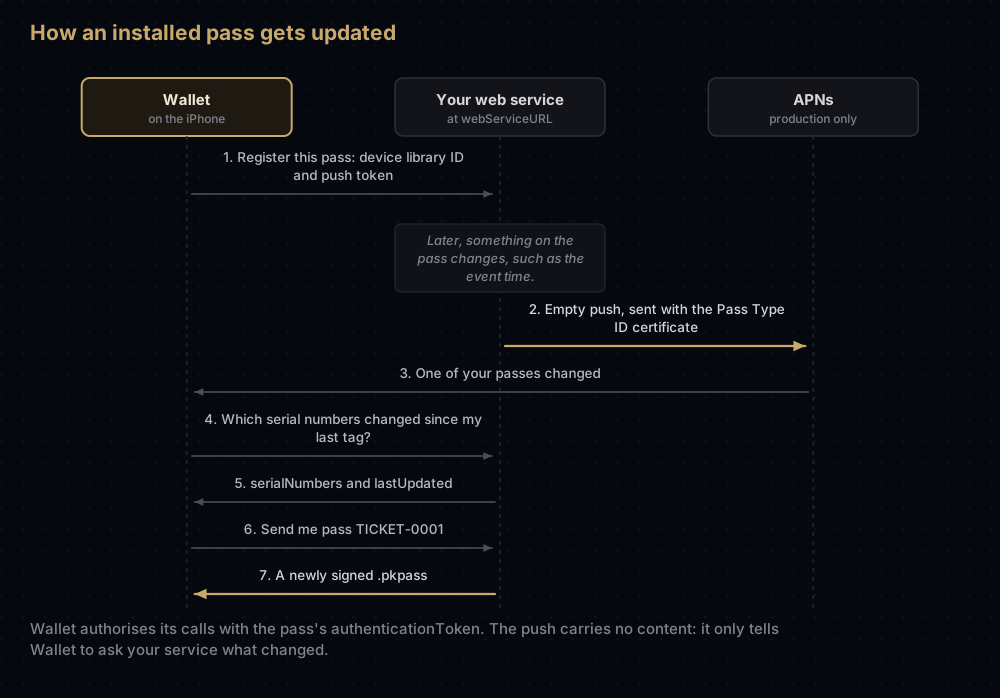
A pass can change after it is issued: a delayed flight, a moved seat, a new balance. People can pull to refresh on the back of a pass, and your server can also push the change to their devices.
To make a pass updatable, put webServiceURL and authenticationToken in pass.json. Wallet then talks to your web service, and your server talks to APNs.
The details from Apple's update guide:
- Wallet registers with
POSTtov1/devices/, then the device library identifier,/registrations/, the pass type identifier,/and the serial number, all under yourwebServiceURL. It sends the headerAuthorization: ApplePassfollowed by the pass'sauthenticationToken. - Your service answers 201 for a new registration, 200 if that serial number is already registered for the device, and 401 if the request is not authorised.
- The update push uses the same certificate and private key that signed the pass, the device's push token, and an empty JSON dictionary as the payload.
- Pass update pushes work only in the production APNs environment.
- If APNs says a push token is invalid, delete that device from your records.
- Production web services must use HTTPS; plain HTTP is allowed only while testing.
- You can change anything in an updated pass except its
authenticationTokenandserialNumber.
So Wallet passes still need the certificate even if your app's own notifications use an APNs .p8 key. How APNs connections work in general is in APNs explained.
When the certificate expires or is revoked
Apple states the effects plainly on its Wallet pages:
| Event | What happens |
|---|---|
| Certificate expires | Passes already in Wallet keep working. You can no longer sign new passes or send updates to existing ones |
| Certificate revoked | Your passes no longer function properly |
| You think the private key leaked | Email product-security@apple.com to ask for revocation. You can request an additional certificate to keep issuing passes |
Two practical points follow. Create the replacement certificate before the old one expires. And because Apple's update guide ties update pushes to the certificate that signed the original pass, while its pages do not describe what happens to older passes after you move to a renewed certificate, send a test update to an installed pass before the old certificate lapses.
Order tracking in Wallet (the "your order has shipped" cards) is a separate system with its own Order Type ID and Order Type ID Certificate. Everything above applies to passes only.
Why a pass will not open
Apple's own checklist for passes that fail to build, in short:
pass.jsonis missing a required key, or is not valid JSON.passTypeIdentifierdoes not match the certificate's Pass Type ID.teamIdentifierdoes not match the account that owns the certificate.- The certificate has expired, or the signing machine does not have it.
manifest.jsonmisses a file, including files in subfolders.- A required image is missing or in the wrong format.
- A date value is not a valid ISO 8601 date.
- Localisation folders have the wrong names, or their
pass.stringsfiles disagree on keys.
Common mistakes
- Editing a file after signing. Any change, even to an image, breaks the manifest. Regenerate the manifest and signature every time.
- Leaving
.DS_Storein the folder. It ends up in the manifest or the zip. Exclude it. - Signing without the G4 intermediate on a server set up years ago.
- Trying to send update pushes to the sandbox. Pass updates work only in production.
- Using an APNs
.p8key for pass updates. Apple's update guide describes the pass certificate and its private key. - Reusing a serial number for a different person's pass. A pass whose identifier and serial number match one already on a device overwrites it.
- Changing the
authenticationTokenin an update. Apple does not allow it; the token and serial number stay fixed. - Committing
pass-key.pemor the.p12to a repository. Treat them like any signing key.
Questions people ask
What is a Pass Type ID?
The identifier you register with Apple for one group of Wallet passes, for example pass.com.example.tickets. It goes in each pass's passTypeIdentifier key, and a Pass Type ID Certificate is issued for it.
Do I need an app to create Apple Wallet passes?
No. You need a developer account to register the identifier and certificate, and a way to sign passes, usually a server. People can add a pass from a web page or an email without any app.
What happens when a Pass Type ID certificate expires?
Passes already installed keep working. You cannot sign new passes or send updates until you use a valid certificate.
Can I use an APNs .p8 key to update Wallet passes?
Apple's pass update guide says the update push uses the same certificate and private key that signed the pass, so plan on the Pass Type ID certificate for pass updates.
Why does Wallet say my pass is invalid?
Common causes from Apple's checklist: the manifest or signature does not match the files, the identifier or Team ID does not match the certificate, the certificate has expired, or a required key or image is missing. Apple's "Building a Pass" page lists every check.
How do I make an NFC Wallet pass?
Add an nfc object to pass.json and sign the pass with an NFC PassKit Certificate, which you request from Apple through the Wallet resources page.
How do I update a pass that is already in Wallet?
Include webServiceURL and authenticationToken in the pass, run a web service that follows Apple's update protocol, and send an empty push through APNs production when the pass changes. Wallet then downloads the new version.
Sources
- Wallet Passes, Building a Pass and Pass, Apple
- Adding a Web Service to Update Passes and Distributing and updating a pass, Apple
- Create Wallet identifiers and certificates and Certificates overview, Apple Developer Account Help
- Getting Started with Apple Wallet and Wallet resources, Apple
Keep reading
- Every certificate in Apple's developer portal: where the Pass Type ID certificate sits among the others.
- Every identifier in Apple's developer portal: Pass Type IDs, Order Type IDs and the rest.
- How to create a certificate signing request on a Mac: the first step for any certificate.
- Export a .p12 from Keychain: moving the signing key to a server.
- APNs explained: the push service behind pass updates.