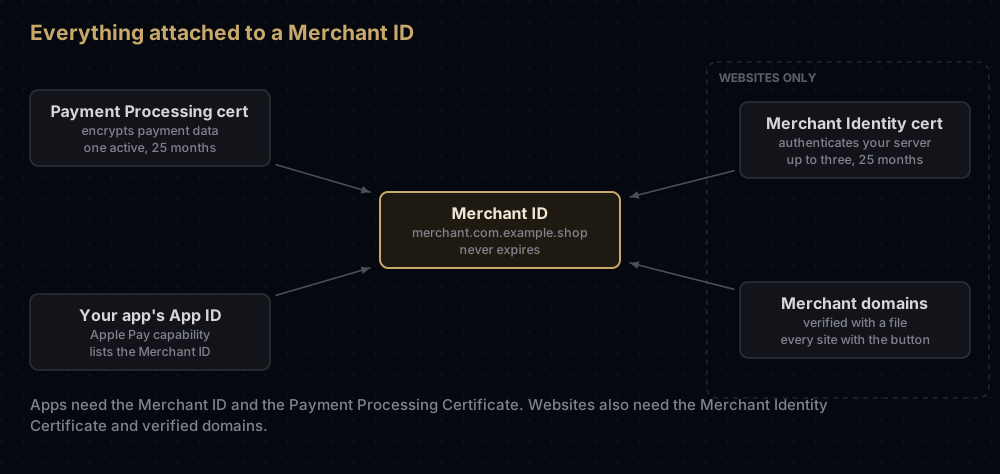
An Apple Pay Merchant ID is the identifier that registers your business with Apple Pay as a merchant that can accept payments, written like merchant.com.example.shop. It never expires, and one Merchant ID can serve several apps and websites.
Two certificates belong to it. The Payment Processing Certificate is the one every Apple Pay integration needs: Apple Pay encrypts each payment with its public key, and only you or your payment provider can decrypt it. The Merchant Identity Certificate is only for Apple Pay on the web: your server presents it to prove who it is when it asks Apple Pay's servers for a payment session. Both last 25 months.
What follows starts with the everyday picture, then covers setup, payment providers such as Stripe, websites, renewals and what breaks when something expires.
The pieces in plain words
Picture a shop that takes payments by locked envelope.
- The Merchant ID is the shop's registration with Apple Pay.
- The Payment Processing Certificate is an open padlock that the shop gives Apple. Apple Pay snaps it shut around each customer's payment details. Only the holder of the matching key can open it, and that is the shop, or the payment company working for it.
- The Merchant Identity Certificate is a staff badge. A website's server shows it whenever it rings Apple Pay's servers, so Apple knows the call really comes from that shop.
- Merchant domains are the shop's registered street addresses: the websites allowed to show the Apple Pay button.
The picture has one limit. Apple never holds the key that opens the padlock. If a payment company such as Stripe does the decrypting, the company holds that key and you never see it.
The credentials at a glance
| Credential | What it does | Needed for | How many | Expires |
|---|---|---|---|---|
| Merchant ID | Identifies you as a merchant to Apple Pay | Apps and websites | Most merchants need one | Never |
| Payment Processing Certificate | Apple Pay encrypts payment data with its public key; the private key decrypts it | Apps and websites | One active per Merchant ID | 25 months |
| Merchant Identity Certificate | A TLS client certificate your server uses with Apple Pay's servers | Websites only | Up to three active per Merchant ID | 25 months |
| Merchant domain verification | Proves you control a site that shows the button | Websites only | Every domain and subdomain showing the button | When the domain's SSL certificate expires |
Apple's technote on updating these certificates also names the key types for the certificate signing requests: a 256-bit ECC key pair for the Payment Processing Certificate (a 2048-bit RSA pair for China mainland), and a 2048-bit RSA key pair for the Merchant Identity Certificate.
Most merchants need only one Merchant ID, for every app, website and test environment. If you create more, each certificate works only with the Merchant ID it was made for.
Step 1: create the Merchant ID
This step needs the Account Holder or Admin role.
- Go to Identifiers in Certificates, Identifiers & Profiles and click the add button.
- Choose Merchant IDs and click Continue.
- Enter a description and the identifier, click Continue, then Register.
You can also create it from Xcode. Then turn on Apple Pay for the app:
- In Xcode, select the app target and open Signing & Capabilities.
- Add the Apple Pay capability.
- Click its refresh button to fetch your Merchant IDs, and tick the one this app uses.
That writes the com.apple.developer.in-app-payments entitlement, a list of Merchant IDs, into the app. With manual signing, enable Apple Pay on the App ID in the portal, assign the Merchant ID there, and regenerate the profiles, because a changed App ID makes its old profiles invalid. The entitlement and profile relationship is explained in iOS entitlements explained.
Step 2: the Payment Processing Certificate
Apple's technote is precise about who does what: the party that decrypts payments creates the key pair and the certificate signing request (CSR). If you decrypt payment tokens on your own server, that is you. If a payment service provider (PSP) does it, the CSR comes from them.
To create the certificate:
- In Identifiers, filter to Merchant IDs and select yours.
- If a banner asks you to accept an agreement, do that first.
- Under Apple Pay Payment Processing Certificate, click Create Certificate.
- Upload the CSR, click Continue, then Download the
.cer.
If you make the CSR yourself, a Mac's Keychain Access works (how to create a CSR), and Apple also mentions OpenSSL and Java's keytool. Remember the key type from the table above.
What happens during a payment
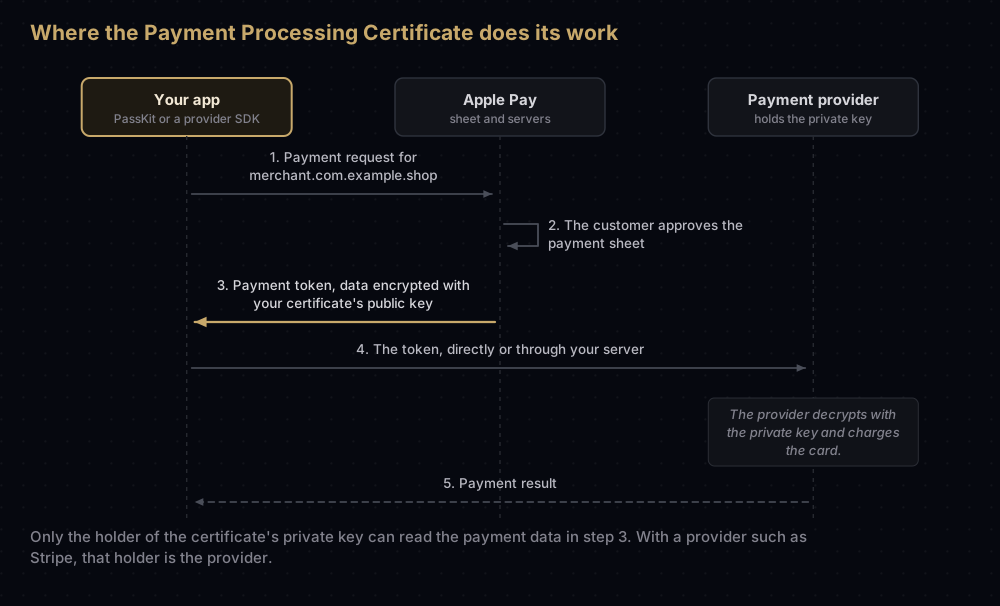
Apple's setup guide describes the encryption half in one sentence: Apple Pay servers use the certificate's public key to encrypt payment data, and you or your payment service provider use the private key to decrypt it. What happens after decryption, the actual charge, is handled by your payment provider or bank.
With a payment provider: Stripe as an example
Each provider documents its own steps, and following them matters more than anything here. Stripe's current iOS guide, as an example:
- Register a Merchant ID in the Apple portal, as in Step 1.
- In the Stripe Dashboard, open iOS Certificate Settings, click Add new application, and download the CSR that Stripe generates.
- Upload that CSR to Apple under Apple Pay Payment Processing Certificate, and download the certificate.
- Upload the certificate to Stripe, following the Dashboard's guide.
- In Xcode, add the Apple Pay capability and select the Merchant ID.
Points from Stripe's guide worth knowing before you start:
- One CSR issues exactly one certificate. If you switch to a different Merchant ID, get a new CSR and certificate from the Dashboard.
- Use the CSR from the Dashboard, not one you generated yourself. Stripe holds the private key behind its CSR, so only a certificate made from that CSR lets Stripe decrypt.
- According to Stripe, the error "You haven't added your Apple merchant account to Stripe" is likely to mean the app is sending payments encrypted for an older, non-Stripe certificate. Revoke certificates made from non-Stripe CSRs under that Merchant ID.
- Stripe accepts Apple Pay from Stripe accounts worldwide except India, at the time of checking.
- For websites, Stripe says Payment Links and hosted Checkout need no extra Apple Pay setup, while Elements and embedded Checkout need your domain registered.
Other providers have their own flows. Apple keeps a list of payment platforms on its Apple Pay page.
Apple Pay on the web
A website needs everything an app needs, plus verified domains and the Merchant Identity Certificate.
Server requirements
Apple's "Setting Up Your Server" page lists them:
- Every page that shows Apple Pay is served over HTTPS, with a valid SSL certificate.
- The server supports TLS 1.2 or later, with one of the cipher suites Apple lists.
- Outgoing connections to Apple Pay use HTTPS on port 443 with Server Name Indication (SNI).
- Your server must be able to reach the Apple Pay addresses and domains Apple lists, such as
apple-pay-gateway.apple.com, and Apple asks you to use a strict allow list of exactly those.
Register and verify each domain
- Select your Merchant ID in the portal.
- Under Merchant Domains, click Add Domain, enter the fully qualified domain name and click Save.
- Click Download, place the file where the page says (the path looks like
/.well-known/apple-developer-merchantid-domain-association), then click Verify.
Rules that come with it:
- Register every domain and subdomain that shows the Apple Pay button.
- One Merchant ID can have many domains, and the same domain can sit under several Merchant IDs, but not under a different Team ID.
- The verification URL cannot be behind a proxy or a redirect, and Apple's verification servers (Apple lists their IP ranges) must be able to reach it.
Create the Merchant Identity Certificate
Under Apple Pay Merchant Identity Certificate, click Create Certificate, upload a CSR made with an RSA 2048-bit key, and download the result. Your server uses this certificate and its private key for mutual TLS with Apple Pay. To turn the download into PEM files a server can load, see converting signing files.
Merchant validation
Each time the Apple Pay sheet opens on your site, Apple Pay asks your page to prove it is a real merchant.
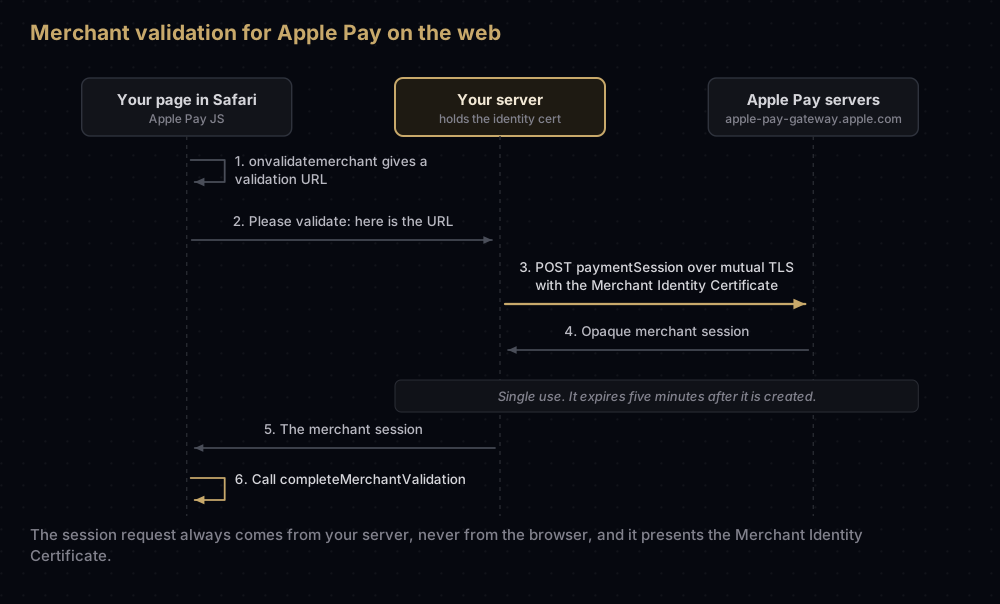
Your server sends the request with the Merchant Identity Certificate as its TLS client certificate. It goes to Apple's Payment Session endpoint, https://apple-pay-gateway.apple.com/paymentservices/paymentSession, or, as Apple also allows, to paymentSession under the validation URL the page received. The JSON body looks like this:
{
  "merchantIdentifier": "merchant.com.example.shop",
  "displayName": "Example Shop",
  "initiative": "web",
  "initiativeContext": "shop.example.com"
}
Apple's rules for it:
- Send it from your server, never from the browser.
displayNameis at most 64 UTF-8 characters, and should stay the same, not include order numbers, and not be translated.initiativeContextis the fully qualified domain name linked to your Merchant Identity Certificate.- Use a new session for every transaction. The session object can be used once and expires five minutes after it is created.
Renewing without an outage
Apple emails the Account Holder and Admins 30, 15 and 7 days before a certificate expires, and recommends renewing at least 30 days ahead. Make sure those inboxes are read.
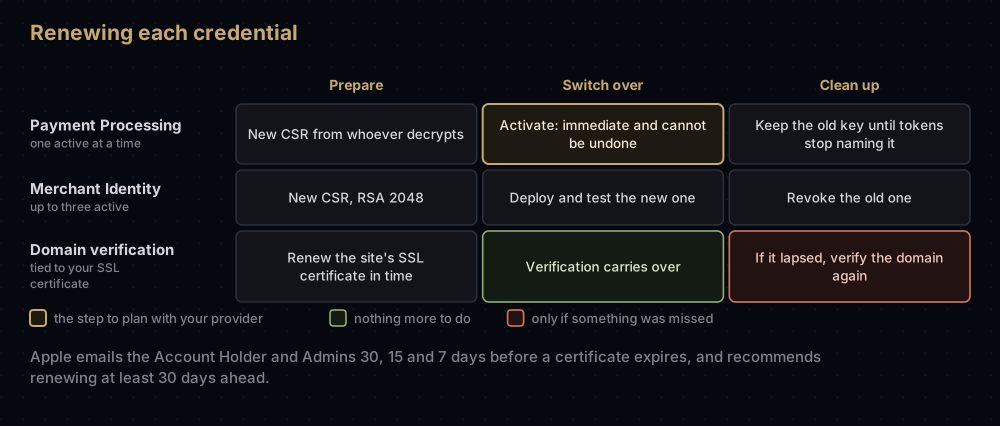
Payment Processing Certificate. A Merchant ID has only one active at a time, so the order matters.
- Create the new certificate from a new CSR made by whoever decrypts.
- If a PSP decrypts, agree the switch with them first. Apple warns that activating too early can interrupt payments.
- Click Activate on the new certificate. Apple Pay starts using it straight away, and the previous certificate is invalidated immediately and permanently.
- For a while, some payments may still be encrypted for the old key. Read
publicKeyHashin each payment token's header to pick the right private key. - Delete the old private key only once
publicKeyHashvalues for it stop arriving.
Merchant Identity Certificate. Up to three can be active, so rotation is gentler: create the new one, install it on your servers, confirm it works, then revoke the old one. If the Create Certificate button is disabled, revoke an older, inactive certificate first; revoking an active one makes Apple Pay requests fail at once.
Domain verification lasts as long as the domain's SSL certificate. Apple checks for a renewed SSL certificate 30, 15 and 7 days before it expires. Renew in time and nothing else is needed; let it lapse and you must verify the domain again. Updating the Apple Pay certificates does not affect domain verification.
Apple's technote also describes listing and revoking these certificates, and creating Payment Processing Certificates, through the App Store Connect API.
What breaks when something expires
| Event | Effect, according to Apple |
|---|---|
| Payment Processing Certificate expires or is revoked | Apple Pay transactions in your apps and on your websites fail |
| Merchant Identity Certificate expires or is revoked | Apple Pay transactions on your websites fail |
| Domain's SSL certificate expires unrenewed | Domain verification expires; verify the domain again |
| Merchant ID | Never expires |
Common mistakes
- Making the CSR yourself when a PSP decrypts. The PSP needs the private key, so the CSR must come from them.
- Activating a new processing certificate before the PSP is ready. Activation cannot be undone, and the old certificate stops working at once.
- Deleting the old private key too early. Tokens encrypted for it can still arrive during the switch; watch
publicKeyHash. - Creating a Merchant Identity Certificate for an app-only integration. Apple says it is needed only for Apple Pay on the web.
- Calling the payment session endpoint from the browser. Apple requires the request to come from your server.
- Putting the verification file behind a proxy or redirect, where Apple's servers cannot reach it.
- Registering only the main domain when the button also appears on a subdomain.
- Unread expiry emails. The reminders go to the Account Holder and Admins, so someone has to watch those inboxes.
- Mixing certificates between Merchant IDs. Each certificate works only with its own Merchant ID.
Questions people ask
What is a Merchant ID in Apple Pay?
The identifier, such as merchant.com.example.shop, that registers your business with Apple Pay as a merchant able to accept payments. Your app lists it in its Apple Pay capability, and your certificates are created under it.
Does an Apple Pay Merchant ID ever expire?
No. The Merchant ID never expires. Its Payment Processing and Merchant Identity certificates expire every 25 months.
What is the difference between the Payment Processing and Merchant Identity certificates?
The Payment Processing Certificate encrypts payment data: Apple Pay uses its public key and you or your provider decrypt with the private key. The Merchant Identity Certificate is a TLS client certificate that authenticates your server to Apple Pay's servers, and it is needed only for Apple Pay on the web.
Do I need a Merchant Identity Certificate for an iOS app?
No. Apple says it is only required for Apple Pay on the web. An app needs the Merchant ID and the Payment Processing Certificate.
Can I use one Merchant ID for several apps and websites?
Yes. Apple says a Merchant ID can be used for multiple apps and websites, and that most merchants need only one.
How many Payment Processing Certificates can be active?
One per Merchant ID. Activating a new one immediately invalidates the previous one. Merchant Identity Certificates allow up to three active at once.
Who should generate the CSR for Apple Pay?
Whoever decrypts the payment data. If Stripe or another provider decrypts, use the CSR they give you.
How long does Apple Pay domain verification last?
Until the domain's SSL certificate expires. If you renew the SSL certificate before then, the verification continues without any action.
Sources
- Configure Apple Pay and Configure Apple Pay on the web, Apple Developer Account Help
- TN3206: Updating Apple Pay certificates, Apple
- Configuring your environment, Maintaining your environment and Requesting an Apple Pay payment session, Apple
- Setting up Apple Pay, Apple
- Apple Pay, Stripe documentation
Keep reading
- Every identifier in Apple's developer portal: Merchant IDs alongside the other identifier types.
- Every certificate in Apple's developer portal: where the two Apple Pay certificates sit.
- How to create a certificate signing request on a Mac: making the CSR yourself.
- iOS entitlements explained: how the Apple Pay capability reaches your build.
- Converting signing files: getting certificates into the format your server expects.